Easy Creamy Banana Pudding Recipe-Best Dessert
Banana pudding. Just the words themselves conjure up images of comforting, creamy goodness. For so many of us, banana pudding isn’t just a dessert; it’s a trip down memory lane, a taste of childhood, and a guaranteed crowd-pleaser. What is it about this simple yet sublime concoction that has captured hearts for generations? I think it’s the perfect harmony of textures and flavors: the soft, sweet slices of banana, the tender bite of vanilla wafers, and the luscious, velvety custard that binds it all together. It’s a dessert that feels both utterly decadent and wonderfully wholesome, making it the ideal treat for any occasion, from a casual family gathering to a festive holiday. This is more than just a recipe; it’s an invitation to create a moment of pure joy.
Ingredients:
Banana pudding is one of those desserts that just screams comfort and nostalgia. It’s simple, it’s creamy, and it’s utterly delicious. Whether you’re making it for a family gathering, a potluck, or just because you’re craving something sweet, this recipe is a guaranteed crowd-pleaser. It’s so easy to whip up, even if you’re new to baking or dessert making. The magic happens in just a few simple steps, creating layers of creamy pudding, sweet bananas, and crunchy vanilla wafers. Let’s get started on creating this classic Southern dessert.
Preparing the Creamy Pudding Base
The foundation of any great banana pudding is a rich and silky pudding. We’re going to use an instant pudding mix for ultimate ease and speed, but we’ll elevate it with a few extra ingredients to make it truly special. This step is crucial for achieving that perfect texture that complements the soft bananas and crisp wafers.
1. In a large mixing bowl, whisk together the 1 (3.4 oz) box of instant vanilla pudding mix and 2 cups of cold milk. It’s important to use cold milk because it helps the pudding to thicken properly and avoids any lumps. Whisk vigorously for about 2 minutes, or until the mixture starts to thicken. You’ll notice it transforming from a liquid to a more custard-like consistency. Don’t be tempted to stop too early; the full 2 minutes of whisking ensures the pudding mix is fully incorporated and begin extracts to set.
2. Now, we’ll add a touch more sweetness and depth of flavor. Pour in the 1 (14 oz) can of sweetened condensed milk and 1 tsp of vanilla extract into the pudding mixture. Gently fold these in using a spatula or a whisk. The sweetened condensed milk will not only add a delightful caramel-like sweetness but also contribute to the pudding’s luxurious, smooth texture. Be sure to scrape the sides and bottom of the bowl to ensure everything is thoroughly combined. Continue to fold until no streaks of sweetened condensed milk remain.
3. The final touch for our pudding base is to incorporate the whipped topping. Add the entire 1 (8 oz) tub of thawed whipped topping to the bowl. The key here is to fold gently. You want to incorporate the whipped topping without deflating it, as this airiness is what gives the pudding its light and fluffy texture. Use a spatula and a folding motion – cutting down through the mixture and then gently bringin extractg it up and over. Continue folding until the whipped topping is just incorporated and no white streaks are visible. The mixture should be light, creamy, and smooth. Overmixing at this stage can make the pudding dense, so take your time and be gentle.
Assembling the Banana Pudding Layers
With our luscious pudding base ready, it’s time to build our masterpiece. This is where the visual appeal of banana pudding truly comes to life, with distinct layers that promise a delightful bite every time.
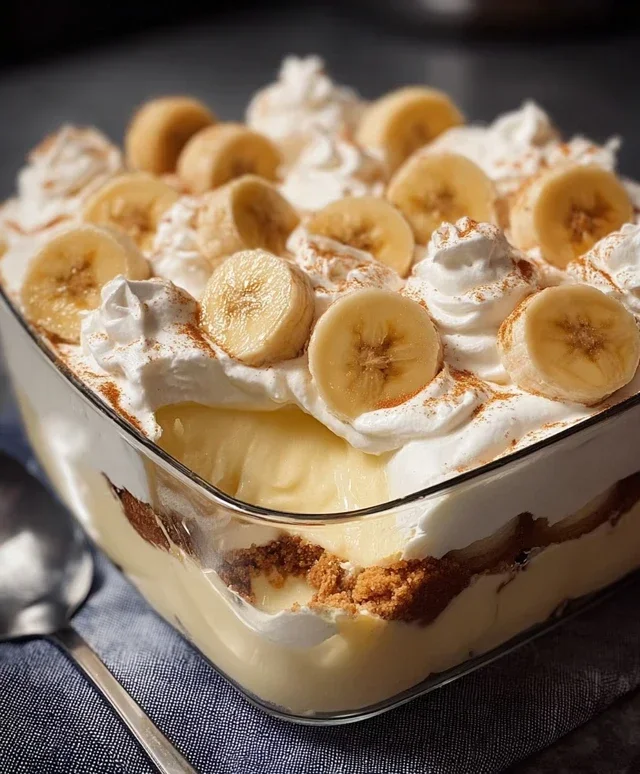
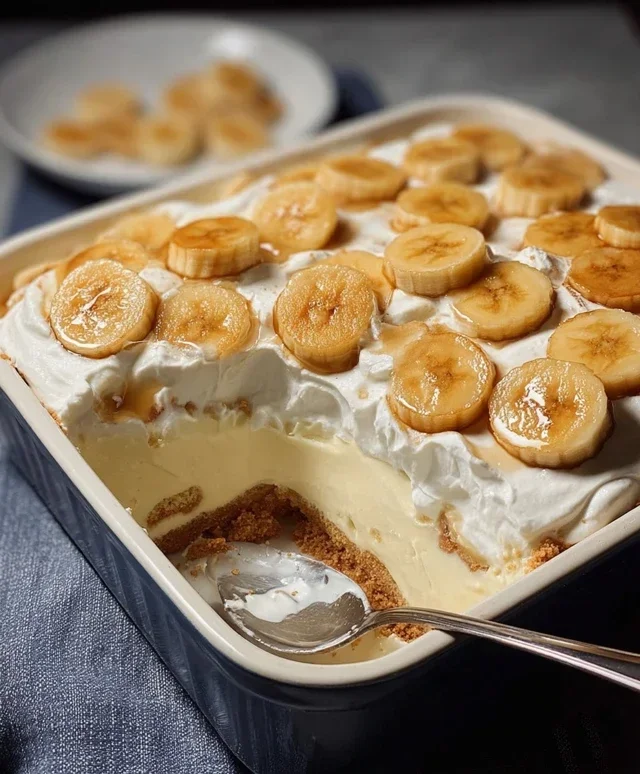
4. Begin extract by preparing your serving dish. A 9×13 inch baking dish or a trifle bowl works beautifully for this recipe, allowing you to showcase the layers. Start by spreading a thin layer of the prepared pudding mixture on the bottom of the dish. This acts as a sort of glue for the first layer of vanilla wafers. Next, arrange a single layer of vanilla wafers over the pudding, breaking them as needed to fill in any gaps. Don’t be shy with the wafers; they’ll soften slightly as they absorb the pudding and become delightfully cake-like. Follow this with a layer of sliced ripe bananas. Aim for about half of your sliced bananas to be used in this first set of layers. Then, spoon another generous layer of the pudding mixture over the bananas and wafers, making sure to cover them completely.
5. Repeat the layering process. Add another layer of vanilla wafers, followed by the remaining sliced bananas. Finally, top everything with the rest of your creamy pudding mixture. Make sure the top layer of pudding is spread evenly to cover all the ingredients underneath. For an even more decadent finish, you can reserve a small amount of whipped topping to dollop on top as a garnish, or sprinkle a few extra crushed vanilla wafers for added texture. Cover the dish tightly with plastic wrap, ensuring the plastic wrap touches the surface of the pudding to prevent a skin from forming.
Chilling and Serving
The final and arguably most important step is allowing the flavors to meld and the pudding to set. This chilling period is what transforms the assembled ingredients into a cohesive and delicious dessert.
6. Refrigerate the banana pudding for at least 2-4 hours, or preferably overnight. This chilling time is essential. It allows the vanilla wafers to soften slightly, absorbing the pudding and creating a delightful cake-like texture, while the flavors of the bananas, pudding, and wafers meld together beautifully. The longer it chills, the more integrated the flavors will become. When you’re ready to serve, give it a gentle stir if needed, or simply scoop out generous portions. Garnish with a few extra banana slices or a dollop of whipped cream if desired. Enjoy this classic, comforting dessert!
Conclusion:
There you have it – a truly delightful and comforting classic banana pudding recipe! This dessert is wonderful because it strikes the perfect balance between creamy, sweet, and satisfying, with the subtle warmth of vanilla and the gentle sweetness of ripe bananas. It’s incredibly versatile and can be dressed up or down for any occasion, from a simple weeknight treat to a show-stopping centerpiece for a potluck. I truly encourage you to give this banana pudding a try; you won’t be disappointed by its crowd-pleasing appeal!
For serving, this banana pudding is fantastic chilled, allowing the flavors to meld beautifully. Consider topping each serving with a dollop of whipped cream and a sprinkle of crushed vanilla wafers for an extra touch of indulgence. Looking for variations? You can easily add a layer of toasted pecans for a delightful crunch, or even a hint of cinnamon to the custard for a spicier note. Some people even love to fold in a few fresh berries for a pop of color and tartness.
Frequently Asked Questions:
Can I make this banana pudding ahead of time?
Absolutely! Banana pudding is actually best made a few hours or even a day in advance. This allows the vanilla wafers to soften slightly and absorb some of the creamy custard, creating that signature delightful texture. Just make sure to store it covered in the refrigerator.
What kind of bananas should I use?
For the best flavor, use ripe to overripe bananas. The riper they are, the sweeter and more intensely banana-flavored they will be. They should have plenty of brown spots but still be firm enough to slice easily.
Can I use store-bought pudding mix?
While this recipe uses a homemade custard for the best flavor and texture, you could technically use a good quality instant vanilla pudding mix as a shortcut if you’re in a pinch. Just follow the package directions for pudding preparation and then proceed with layering the ingredients.
Classic Banana Pudding
A simple and delicious no-bake banana pudding made with creamy vanilla pudding, sweet condensed milk, fresh bananas, and crunchy vanilla wafers.
Ingredients
-
1 (3.4 oz) box instant vanilla pudding mix
-
2 cups cold milk
-
1 (14 oz) can sweetened condensed milk
-
1 tsp vanilla extract
-
1 (8 oz) tub whipped topping, thawed
-
4-5 ripe bananas, sliced
-
1 (11 oz) box vanilla wafers
Instructions
-
Step 1
In a large bowl, whisk together the instant vanilla pudding mix and cold milk until smooth and thickened. -
Step 2
Stir in the sweetened condensed milk and vanilla extract until well combined. -
Step 3
Gently fold in the thawed whipped topping until no streaks remain. -
Step 4
In a serving dish, layer half of the vanilla wafers, followed by half of the sliced bananas, and then half of the pudding mixture. -
Step 5
Repeat the layering process with the remaining vanilla wafers, bananas, and pudding mixture. -
Step 6
Cover and refrigerate for at least 2-4 hours, or until chilled and set. The wafers will soften slightly.
Important Information
Nutrition Facts (Per Serving)
It is important to consider this information as approximate and not to use it as definitive health advice.
Allergy Information
Please check ingredients for potential allergens and consult a health professional if in doubt.