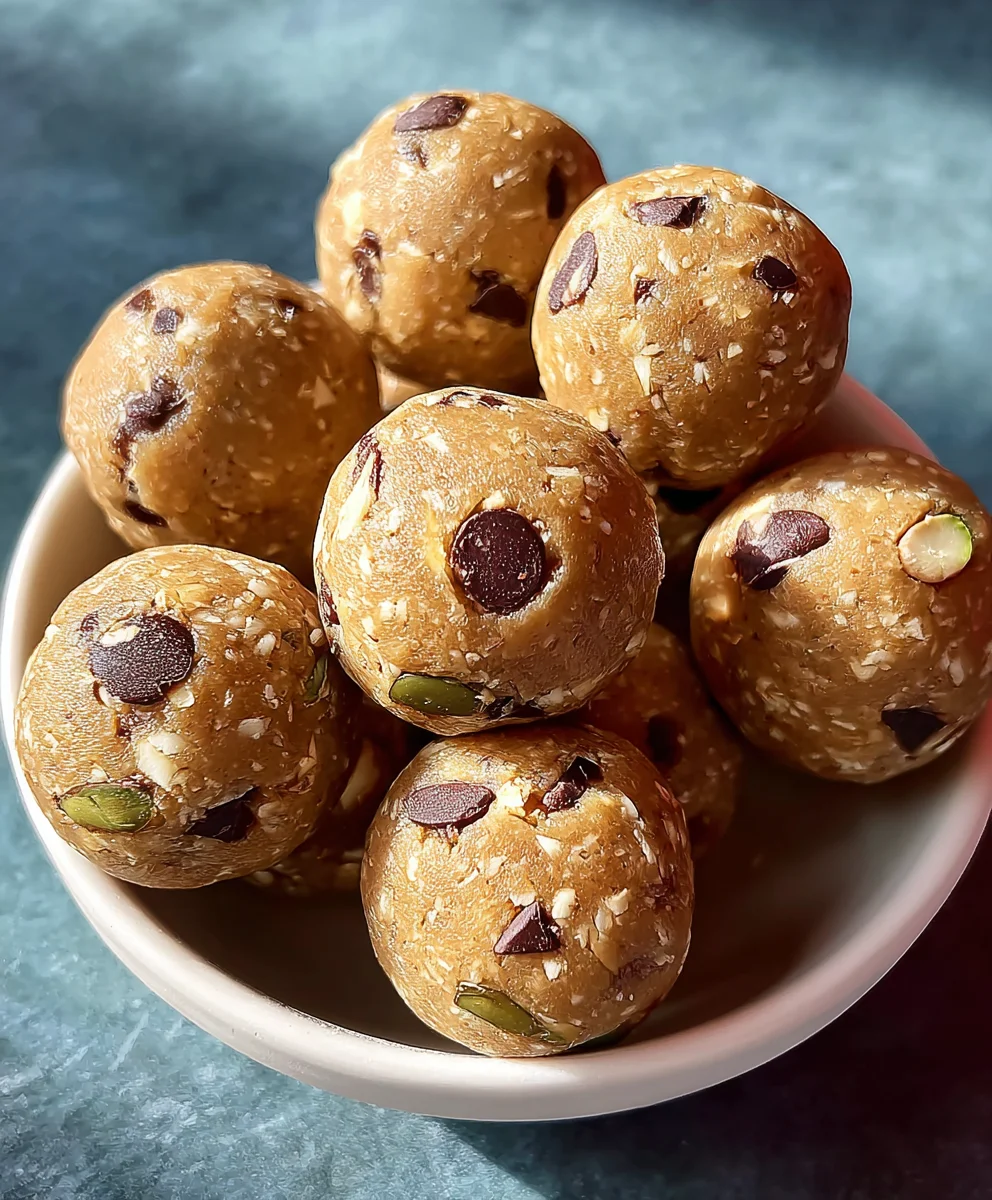
No-Bake Chickpea Cookie Bites-Easy Sweet Treat
No-Bake Chickpea Cookie Bites are about to become your new favorite guilt-free indulgence. Imagin extracte a sweet treat that’s not only incredibly delicious but also packed with plant-based protein and fiber – that’s the magic of these delightful morsels! We all crave that satisfying crunch and sweet chegrape juicess of a cookie, but the thought of preheating the oven and the inevitable cleanup can be a deterrent, especially on a warm day or when you’re short on time. That’s precisely why these no-bake wonders are so beloved. They offer all the joy of a homemade cookie without any of the fuss. What truly sets these No-Bake Chickpea Cookie Bites apart is their surprisingly simple base: mashed chickpeas. Don’t let that ingredient surprise you; it creates a wonderfully moist and slightly nutty texture that pairs perfectly with the other wholesome ingredients. Get ready to whip up a batch of these addictive treats in mere minutes, perfect for a quick snack, a healthy dessert, or even a post-workout refuel.

Ingredients:
- 15.5 ounces chickpeas (garbanzo beans), drained and dried
- 1/2 cup whole oats
- 1/4 cup maple syrup
- 1 teaspoon vanilla extract
- 1/2 teaspoon salt
- 1/4 cup mini chocolate chips
Preparing the Base
The first step in creating these delightful No-Bake Chickpea Cookie Bites is to prepare our star ingredient: the chickpeas. You’ll want to ensure your chickpeas are thoroughly drained. If you’re using canned chickpeas, give them a good rinse under cold water to remove any residual brine, which can affect the final flavor. After draining, it’s crucial to dry them as much as possible. You can spread them out on a clean kitchen towel or paper towels and gently pat them dry. The less moisture, the better the texture of your bites will be. Once dried, transfer the chickpeas to a food processor. This is where we’ll transform them into a smooth, cookie-dough-like base. Aim for a consistency that is mostly smooth, but a few tiny chickpea flecks are perfectly fine and can add a pleasant texture. Think of it as a very thick paste. Avoid over-processing to the point of becoming watery; we want a substantial base for our bites.
Combining and Sweetening
Now that our chickpea base is ready, it’s time to introduce the other essential components that will give these No-Bake Chickpea Cookie Bites their characteristic flavor and sweetness. Add the whole oats to the food processor with the chickpea puree. The oats will provide structure and a satisfying chegrape juicess to the final product, ensuring they aren’t too mushy. Next, pour in the maple syrup. This liquid sweetener not only adds a wonderful caramel-like depth of flavor but also helps bind all the ingredients together. For that classic cookie aroma and taste, add the vanilla extract. A good quality vanilla extract makes a noticeable difference. Finally, sprinkle in the salt. Salt might seem counterintuitive in a sweet treat, but it’s a crucial flavor enhancer. It balances the sweetness of the maple syrup and the richness of the chocolate chips, making the overall taste more complex and enjoyable. Now, pulse the food processor a few times to begin extract incorporating these ingredients. You want them to start coming together, but don’t blend them into a completely smooth paste just yet. We still have one more delicious addition.
Folding in the Chocolate Chips
This is arguably the most exciting part of making No-Bake Chickpea Cookie Bites – adding the chocolate! Remove the food processor bowl from the base. This is important because over-processing the chocolate chips can cause them to melt and smear, leading to a less appealing appearance and texture in your finished bites. Gently fold in the mini chocolate chips using a spatula or a sturdy spoon. Make sure to distribute them evenly throughout the mixture. The mini size is perfect because they provide bursts of chocolatey goodness in every bite without being overwhelming, and they are easier to incorporate into the thicker mixture. Ensure that each spoonful of dough gets a good scattering of chips for maximum chocolate enjoyment. This folding technique helps maintain the integrity of the chocolate chips, so you get distinct pockets of melted chocolate when you enjoy your cookie bites.
Forming the Cookie Bites
With all our delicious ingredients combined, it’s time to shape these into irresistible No-Bake Chickpea Cookie Bites. Take the mixture from the food processor and use a small spoon or a tablespoon to scoop out portions. Roll each portion gently between your palms to form bite-sized balls. They don’t need to be perfectly uniform; a slightly rustic appearance adds to their homemade charm. If the mixture feels a bit sticky to handle, you can lightly dampen your hands with water or a tiny bit of oil, or even chill the mixture in the refrigerator for about 15-20 minutes before rolling. Chilling will make it firmer and easier to work with. Aim for a size that’s easy to pop into your mouth – about 1 to 1.5 inches in diameter is ideal. As you form them, place them on a plate or baking sheet lined with parchment paper to prevent sticking.
Chilling and Enjoying
The final, and perhaps most important, step for these No-Bake Chickpea Cookie Bites is the chilling process. Once all the cookie bites have been formed and arranged on your lined plate or baking sheet, it’s time to let them firm up. Place the entire plate or baking sheet into the refrigerator for at least 30 minutes. This chilling time allows the flavors to meld together beautifully, and it helps the cookie bites set properly, giving them a more cohesive texture. They will firm up significantly, making them less likely to fall apart when you handle or eat them. For an even firmer texture, you can leave them in the refrigerator for an hour or even freeze them for about 15-20 minutes if you’re short on time and want them to firm up quickly. Once they’ve chilled and firmed up, your No-Bake Chickpea Cookie Bites are ready to be enjoyed! They store well in an airtight container in the refrigerator for up to a week, making them a fantastic make-ahead snack.
Conclusion:
We’ve reached the end of our delicious journey into creating these amazing No-Bake Chickpea Cookie Bites! I hope you’ve found this recipe as enjoyable to make as it is to eat. These little bites are a testament to how simple, wholesome ingredients can come together to create something truly satisfying without ever turning on the oven. They are the perfect healthy treat for busy afternoons, post-workout snacks, or even a guilt-free dessert.
I love serving these No-Bake Chickpea Cookie Bites chilled, straight from the refrigerator for a delightful texture. They pair wonderfully with a cup of herbal tea or a glass of almond milk. Feel free to get creative with your own twists! Consider adding a sprinkle of shredded coconut, a dash of cinnamon, or even some chopped nuts for added crunch and flavor. The possibilities are endless! Don’t be afraid to experiment and make these your own. Happy baking—or rather, no-baking!
FAQs for No-Bake Chickpea Cookie Bites
Can I make these ahead of time?
Absolutely! The No-Bake Chickpea Cookie Bites are perfect for meal prep. Store them in an airtight container in the refrigerator for up to a week. They actually tend to firm up a bit more in the fridge, which is quite pleasant.
Are these vegan?
Yes, this recipe for No-Bake Chickpea Cookie Bites is naturally vegan, provided you use a plant-based sweetener like maple syrup or agave nectar.
No-Bake Chickpea Cookie Bites
Easy and delicious no-bake cookie bites made with chickpeas, oats, and chocolate chips. A perfect sweet treat for any time!
Ingredients
-
15.5 ounces chickpeas (garbanzo beans), drained and dried
-
1/2 cup whole oats
-
1/4 cup maple syrup
-
1 teaspoon vanilla extract
-
1/2 teaspoon salt
-
1/4 cup mini chocolate chips
Instructions
-
Step 1
Drain and thoroughly dry the chickpeas. Transfer them to a food processor and process until mostly smooth, creating a thick paste. -
Step 2
Add whole oats, maple syrup, vanilla extract, and salt to the food processor. Pulse a few times to begin incorporating the ingredients. -
Step 3
Remove the food processor bowl and gently fold in the mini chocolate chips with a spatula or spoon until evenly distributed. -
Step 4
Scoop portions of the mixture using a spoon and gently roll between your palms to form bite-sized balls (about 1 to 1.5 inches in diameter). Place on a parchment-lined plate or baking sheet. -
Step 5
Chill the cookie bites in the refrigerator for at least 30 minutes to firm up before enjoying.
Important Information
Nutrition Facts (Per Serving)
It is important to consider this information as approximate and not to use it as definitive health advice.
Allergy Information
Please check ingredients for potential allergens and consult a health professional if in doubt.