Banana Pudding Cheesecake Cones-Irresistible Dessert
Banana Pudding Cheesecake Cones are about to become your new obsession. Forget everything you thought you knew about dessert because we’re about to dive headfirst into a flavor explosion that’s both nostalgic and outrageously decadent. Imagin extracte the creamy, dreamy layers of classic banana pudding, the tangy richness of cheesecake, all nestled within a perfectly crisp, edible cone. It’s the ultimate fusion, a dessert dream team that appeals to our deepest sweet cravings. People adore this because it takes beloved comfort food elements and elevates them into something truly spectacular. What makes these Banana Pudding Cheesecake Cones so special is the delightful textural contrast and the ingenious way we’ve combined two iconic desserts into one handheld masterpiece. Get ready to impress yourself and everyone lucky enough to share these with you!
Banana Pudding Cheesecake Cones
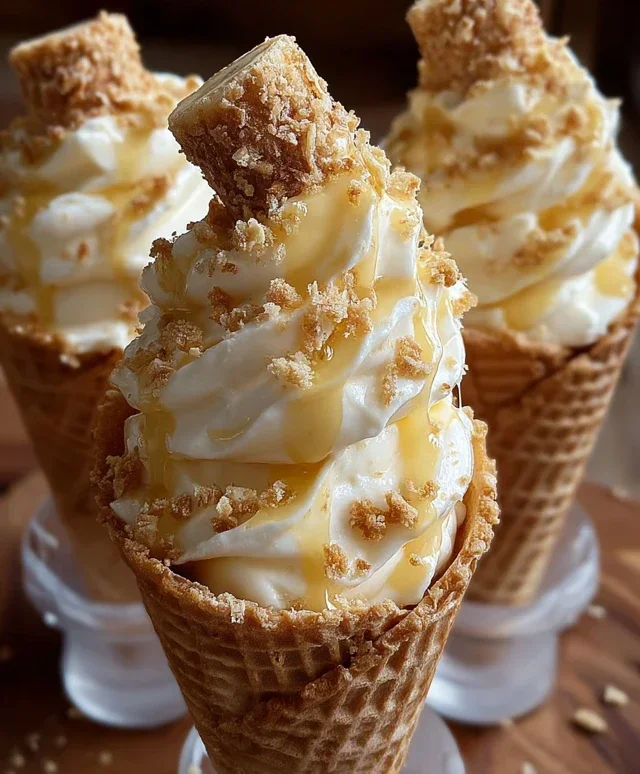
Get ready to embark on a dessert adventure that combines the comforting nostalgia of banana pudding with the decadent indulgence of cheesecake, all nestled within a crispy waffle cone. These Banana Pudding Cheesecake Cones are a showstopper, perfect for parties, a special treat, or simply when you’re craving something truly extraordinary. Imagin extracte layers of creamy, tangy cheesecake filling, infused with the sweet essence of banana, topped with whipped cream and a delightful crunch of crushed vanilla wafers. It’s a symphony of textures and flavors that will have everyone asking for the recipe. This recipe might seem a little fancy, but trust me, it’s surprisingly approachable and the results are absolutely worth every minute. Let’s dive into creating these little cups of joy!
Ingredients:
Cheesecake Filling Preparation
The foundation of our delicious cones lies in a luscious and tangy cheesecake filling. It’s crucial to ensure your cream cheese is properly softened for a smooth, lump-free mixture. You can leave it on the counter for about an hour, or if you’re in a hurry, you can gently warm it in the microwave in 15-second intervals, stirring in between, until it’s pliable. In a medium mixing bowl, combine the softened cream cheese and the powdered sugar. I like to use a hand mixer or a stand mixer fitted with the whisk attachment for this step, but a sturdy spatula and some elbow grease will also work. Beat them together until the mixture is completely smooth and creamy, with no gritty sugar remaining. This might take a couple of minutes of consistent mixing. Once it’s smooth, add the vanilla extract and mix it in until well incorporated. The vanilla enhances all the other flavors and adds a beautiful aromatic quality to the filling.
Next, we’ll gently fold in our pre-whipped heavy whipping cream. Remember, we want stiff peaks, which means the cream should hold its shape when you lift the whisk. Gently folding means using a spatula to lift the cream from the bottom of the bowl and fold it over the cream cheese mixture, rather than vigorously stirring. This helps to keep the filling light and airy, creating that signature cheesecake texture. Continue folding until there are no streaks of cream cheese visible and the mixture is homogenous. This step is key to achieving a delicate and melt-in-your-mouth consistency.
Banana Pudding Layer
Now, let’s introduce the star of our show – the banana pudding! In a separate bowl, combine the instant banana pudding mix with the cold milk. It’s important to use cold milk as this helps the pudding to set up quickly and properly. Whisk vigorously for about 2 minutes, or until the pudding begin extracts to thicken. You’ll notice it thickening almost immediately. Let this pudding mixture sit for about 5 minutes to allow it to fully set into a thick, creamy consistency. Instant pudding is a wonderfully convenient ingredient that delivers fantastic flavor without a lot of fuss.
Once the pudding has set, we’ll combine it with our cheesecake filling. Gently fold the thickened banana pudding into the prepared cheesecake mixture. Again, the key here is to fold rather than stir aggressively, preserving the airiness we incorporated earlier. You want to achieve a beautiful swirl of banana pudding and cheesecake, creating distinct layers of flavor and color within our final filling. Don’t overmix; a few gentle swirls will do the trick. This combination creates a flavor profile that is both familiar and exciting, perfectly balancing the tang of the cream cheese with the sweet, unmistakable taste of banana.
Assembling the Cones
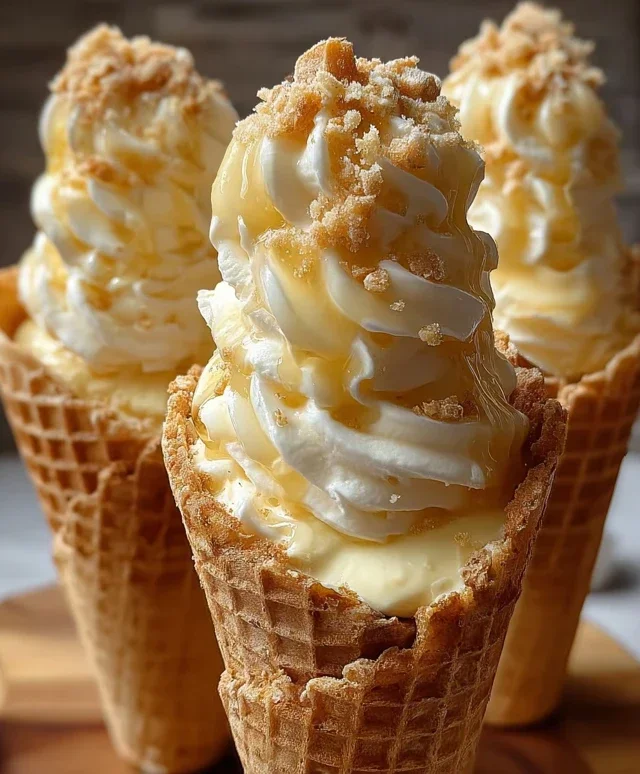
This is where the magic happens! Take your waffle cones and carefully spoon or pipe the banana pudding cheesecake filling into each one. I find that using a piping bag with a large round tip makes for a neater and more professional-looking fill, but a spoon works just as well. Fill them almost to the brim, leaving a little space at the top for your whipped cream and toppings. As you fill, try to get the filling all the way to the bottom of the cone so you get that creamy goodness in every bite.
Now, for the delightful crunch! Sprinkle a generous amount of crushed vanilla wafers or grabeef beef ham crackers into the bottom of each cone before adding the filling. This creates a wonderful textural contrast and prevents the bottom of the cone from becoming soggy. About a tablespoon in each cone should be perfect. You can also add a small layer of crushed wafers on top of the filling before adding whipped cream if you like extra crunch.
Finishing Touches and Serving
Top each filled cone with a dollop of whipped cream. You can spoon it on or pipe it for a more decorative finish. This adds another layer of creamy goodness and a beautiful visual appeal. Next, drizzle generously with caramel sauce or sweetened condensed milk. This adds an extra layer of sweetness and a touch of indulgence that perfectly complements the banana and cheesecake flavors. Finally, sprinkle some extra crushed vanilla wafers on top of the whipped cream and drizzle for that signature banana pudding look and an irresistible crunch.
For the best experience, serve these Banana Pudding Cheesecake Cones immediately. The combination of the crisp cone, creamy filling, and crunchy toppings is best enjoyed fresh. If you need to prepare them a little in advance, you can assemble the cones and keep them in the refrigerator for a few hours. However, be aware that the waffle cone might soften slightly over time. These are truly a delightful treat that are sure to impress!
Conclusion:
There you have it! My Banana Pudding Cheesecake Cones are officially ready to be devoured. I truly believe this recipe is a winner because it brilliantly combines the creamy, dreamy decadence of cheesecake with the comforting, nostalgic flavors of banana pudding, all served in an easy-to-eat, fun ice cream cone. It’s a dessert that’s both elegant enough for a special occasion and casual enough for a weeknight treat. Imagin extracte the delighted smiles as your guests bite into this delightful creation! These cones are fantastic served chilled on a warm day, or as a unique ending to any meal. They’re also wonderfully versatile – feel free to experiment! Add a swirl of caramel, a sprinkle of crushed Nilla Wafers, or even a few chocolate chips for an extra layer of indulgence. I wholeheartedly encourage you to give this recipe a try; I’m confident you’ll fall in love with its playful presentation and irresistible taste. Happy baking (or should I say, no-baking!)!
Frequently Asked Questions:
Can I make these ahead of time?
Yes, absolutely! You can prepare the cheesecake filling and the banana pudding layers a day in advance. Store them separately in airtight containers in the refrigerator. Assemble the cones just before serving to ensure the cones stay crisp.
What if I don’t have ice cream cones?
No problem! If you can’t find ice cream cones, you can easily adapt this recipe into a traditional cheesecake. Simply bake the cheesecake in a springform pan as usual, then top it with the banana pudding and whipped cream. Alternatively, you could serve the filling in individual ramekins.
How do I prevent the cones from getting soggy?
The key to crisp cones is to assemble them just before serving. If you need to assemble them a little earlier, you can try lightly brushing the inside of the cones with melted white chocolate and letting it set. This creates a barrier that helps prevent moisture from the filling.
Banana Pudding Cheesecake Cones
A delightful no-bake dessert combining creamy cheesecake, banana pudding, and crunchy waffle cones.
Ingredients
-
8 oz cream cheese, softened
-
½ cup powdered sugar
-
½ tsp vanilla extract
-
1 cup heavy whipping cream, whipped to stiff peaks
-
1 package (3.4 oz) instant banana pudding mix
-
2 cups cold milk
-
8 waffle cones
-
½ cup crushed vanilla wafers
-
Caramel sauce or sweetened condensed milk drizzle
-
Extra crushed vanilla wafers
Instructions
-
Step 1
In a large bowl, beat together the softened cream cheese, powdered sugar, and vanilla extract until smooth and creamy. -
Step 2
Gently fold in the whipped heavy cream until just combined. -
Step 3
In a separate medium bowl, whisk together the instant banana pudding mix and cold milk. Let it sit for 2 minutes to thicken. -
Step 4
Fold the thickened banana pudding into the cream cheese mixture until evenly distributed. -
Step 5
Spoon the banana pudding cheesecake mixture into the waffle cones, filling them almost to the top. -
Step 6
Sprinkle the crushed vanilla wafers over the top of each filled cone. -
Step 7
Drizzle with caramel sauce or sweetened condensed milk. -
Step 8
Garnish with extra crushed vanilla wafers. Chill for at least 30 minutes before serving.
Important Information
Nutrition Facts (Per Serving)
It is important to consider this information as approximate and not to use it as definitive health advice.
Allergy Information
Please check ingredients for potential allergens and consult a health professional if in doubt.