Mini Cookie Butter Cheesecake Cups – Easy Dessert Recipe
Mini Cookie Butter Cheesecake Cups are about to become your new obsession. If you’ve ever found yourself lost in the irresistible, nutty-sweet embrace of cookie butter, then prepare yourself for pure bliss. These delightful little treats take everything you love about classic cheesecake and infuse it with that magical cookie butter flavor we all crave. They’re not just desserts; they’re mini celebrations in every bite. What makes these so special? It’s the perfect marriage of creamy, tangy cheesecake and the rich, spiced warmth of cookie butter, all nestled within a buttery cookie crust. Imagin extracte a miniature masterpiece, perfectly portioned for individual indulgence, that’s both incredibly decadent and surprisingly easy to whip up. Get ready to impress yourself and anyone lucky enough to share these amazing Mini Cookie Butter Cheesecake Cups with you.
Mini Cookie Butter Cheesecake Cups
Get ready to fall in love with these adorable and incredibly delicious Mini Cookie Butter Cheesecake Cups! These little gems are the perfect balance of creamy, decadent cheesecake and the irresistible spiced sweetness of cookie butter. They’re surprisingly easy to make and are guaranteed to be a showstopper at any gathering, or simply a delightful treat to indulge in yourself. Forget complicated springform pans; these individual cups are fuss-free and deliver maximum flavor in every bite.
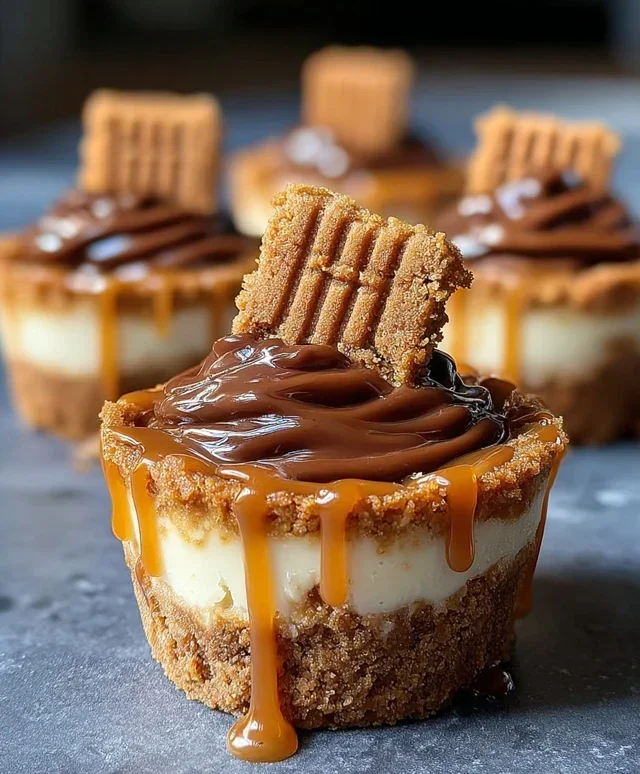
The base of these delightful cups is made from crushed Biscoff cookies, which gives them a wonderfully spiced and slightly crunchy foundation. This pairs perfectly with the rich, smooth cookie butter cheesecake filling. And for an extra touch of indulgence, we’re topping them with luscious caramel sauce, a sprinkle of cookie crum extractbs, and a dollop of fluffy whipped cream, all crowned with a whole Biscoff cookie. It’s a flavor explosion you won’t soon forget!
Ingredients:
Cooking Instructions:
Let’s dive into creating these irresistible treats!
1. Prepare the Cookie Crust:
First things first, we need to create that delicious cookie base. If you haven’t already, you’ll need to grind your Biscoff cookies into fine crum extractbs. You can do this by placing them in a food processor and pulsing until they resemble coarse sand, or if you don’t have a food processor, place them in a sturdy zip-top bag and crush them with a rolling pin. In a medium bowl, combine the 1 ½ cups of Biscoff cookie crum extractbs with the ¼ cup of melted butter. Stir until all the crum extractbs are evenly moistened. This mixture should resemble wet sand. Next, divide this crum extractb mixture evenly among your mini muffin tin cups. I usually use a mini muffin tin with about 24 cups. Press the crum extractbs firmly into the bottom of each cup. You can use the back of a small spoon or even the bottom of a shot glass to help compact the crum extractbs. This step is crucial for a sturdy crust that won’t crum extractble when you enjoy your cheesecake cups. Place the prepared muffin tin in the refrigerator while you prepare the filling. This will help the crust set and become firm.
2. Whip up the Creamy Cheesecake Filling:
Now for the star of the show: the cookie butter cheesecake filling! Make sure your 8 oz of cream cheese is softened to room temperature. This is important for a smooth and lump-free filling. In a large bowl, beat the softened cream cheese with an electric mixer until it’s completely smooth and creamy. Add the ½ cup of cookie butter and the ¼ cup of powdered sugar to the cream cheese. Beat again until well combined and the mixture is smooth and homogenous. Scrape down the sides of the bowl periodically to ensure everything is incorporated. Now, in a separate, clean bowl, whip the ½ cup of heavy whipping cream with the 1 tsp of vanilla extract until stiff peaks form. Be careful not to overmix, or you’ll end up with butter! Gently fold this whipped cream into the cream cheese and cookie butter mixture. Folding in the whipped cream will make the cheesecake filling light and airy.
3. Assemble the Cheesecake Cups:
Once your crust is chilled and your filling is ready, it’s time to bring it all together. Carefully remove the muffin tin from the refrigerator. Spoon or pipe the cookie butter cheesecake filling evenly over the chilled cookie crusts in each mini muffin cup. Aim for a generous dollop in each cup, filling them almost to the top. Using a piping bag with a large round tip makes this step super neat and easy, but a spoon works perfectly fine too! Smooth the tops of the cheesecake filling with the back of a spoon or a small offset spatula for a polished look.
4. Chill and Decorate for Perfection:
This is where the magic happens and the flavors meld. Cover the muffin tin loosely with plastic wrap and refrigerate for at least 4 hours, or preferably overnight. Chilling is essential for the cheesecakes to set properly and for the flavors to fully develop. Once the cheesecakes are firmly set, you can carefully remove them from the muffin tin. You might need to gently run a thin knife around the edges to loosen them. If you’ve greased your mini muffin tin lightly, they should pop out easily. Now for the fun part – decorating! Drizzle each cheesecake cup with about a teaspoon of caramel sauce. Then, sprinkle a little extra Biscoff crum extractbs over the caramel. Finally, top each one with a generous swirl of whipped cream and a whole Biscoff cookie. The combination of the creamy cheesecake, spiced cookie butter, sweet caramel, and fluffy whipped cream is simply divine.
5. Serve and Enjoy Your Masterpiece:
Your Mini Cookie Butter Cheesecake Cups are now ready to be devoured! These are best served chilled. They are perfect for parties, holidays, or just when you’re craving something sweet and special. The individual portions make them incredibly convenient and allow everyone to have their own little slice of heaven. You can make these a day in advance, which is always a bonus when entertaining. Just store them covered in the refrigerator and add the whipped cream and garnish just before serving to keep them looking their best. Enjoy every single creamy, cookie-buttery bite!

Conclusion:
I hope you’ve enjoyed learning how to make these delightful Mini Cookie Butter Cheesecake Cups! They are truly a showstopper, offering a perfect balance of creamy, rich cheesecake and the irresistible sweet, nutty flavor of cookie butter. The mini size makes them ideal for portion control (though you might find yourself reaching for a second!), and they’re incredibly versatile for any occasion, from a casual get-together to a more formal dessert table. Whether you’re a seasoned baker or just starting out, this recipe is wonderfully approachable and yields impressive results. Don’t be afraid to experiment with the variations mentioned; that’s where the real fun begin extracts in the kitchen!
I encourage you all to give these Mini Cookie Butter Cheesecake Cups a try. They’re sure to become a new favorite in your dessert repertoire, bringin extractg smiles and satisfied sighs with every bite. Let me know how yours turn out!
Frequently Asked Questions:
Can I make these ahead of time?
Absolutely! These Mini Cookie Butter Cheesecake Cups are perfect for making ahead. You can prepare them up to 2 days in advance and store them, covered, in the refrigerator. This also allows the flavors to meld beautifully, making them even more delicious. Just add any final toppings right before serving.
What if I can’t find cookie butter? Are there any substitutions?
While cookie butter is the star, you can achieve a similar deliciousness with substitutions! A good alternative is a smooth peanut butter mixed with a touch of brown sugar and a pinch of cinnamon. Another option is biscoff cookies finely crushed and mixed with a little melted butter to create a paste, though this will be less smooth than traditional cookie butter.
How long do these cheesecakes last in the refrigerator?
Stored in an airtight container, these mini cheesecakes will typically stay fresh and delicious in the refrigerator for up to 4-5 days. However, I suspect they won’t last that long because they are so incredibly tasty!
Mini Cookie Butter Cheesecake Cups
Delightful no-bake cheesecake cups featuring a Biscoff cookie crust and a creamy, rich cookie butter filling, topped with caramel, extra crumbs, whipped cream, and whole cookies.
Ingredients
-
1 ½ cups Biscoff cookie crumbs (or graham cracker crumbs)
-
¼ cup melted butter
-
8 oz cream cheese, softened
-
½ cup cookie butter (Biscoff spread)
-
¼ cup powdered sugar
-
½ cup heavy whipping cream
-
1 tsp vanilla extract
-
½ cup caramel sauce
-
Extra Biscoff crumbs
-
Whipped cream
-
Whole Biscoff cookies for garnish
Instructions
-
Step 1
Combine Biscoff cookie crumbs and melted butter in a bowl. Press mixture evenly into the bottoms of 12 mini muffin cups lined with paper liners or greased. -
Step 2
In a separate bowl, beat softened cream cheese until smooth. Add cookie butter and powdered sugar; beat until well combined and creamy. -
Step 3
In another bowl, whip heavy whipping cream with vanilla extract until stiff peaks form. -
Step 4
Gently fold the whipped cream into the cream cheese and cookie butter mixture until just combined. -
Step 5
Spoon or pipe the cheesecake filling over the cookie crusts in each mini muffin cup. -
Step 6
Drizzle caramel sauce over the top of each cheesecake cup. -
Step 7
Sprinkle with extra Biscoff crumbs, top with a dollop of whipped cream, and garnish with a whole Biscoff cookie. -
Step 8
Refrigerate for at least 30 minutes before serving to allow the cheesecakes to set.
Important Information
Nutrition Facts (Per Serving)
It is important to consider this information as approximate and not to use it as definitive health advice.
Allergy Information
Please check ingredients for potential allergens and consult a health professional if in doubt.