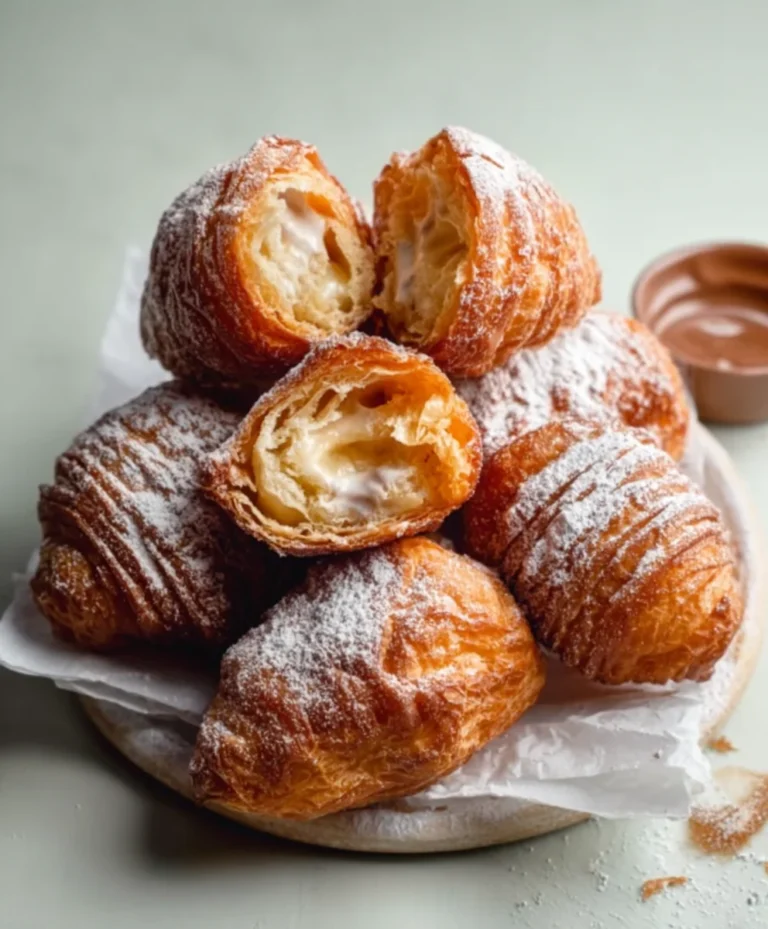
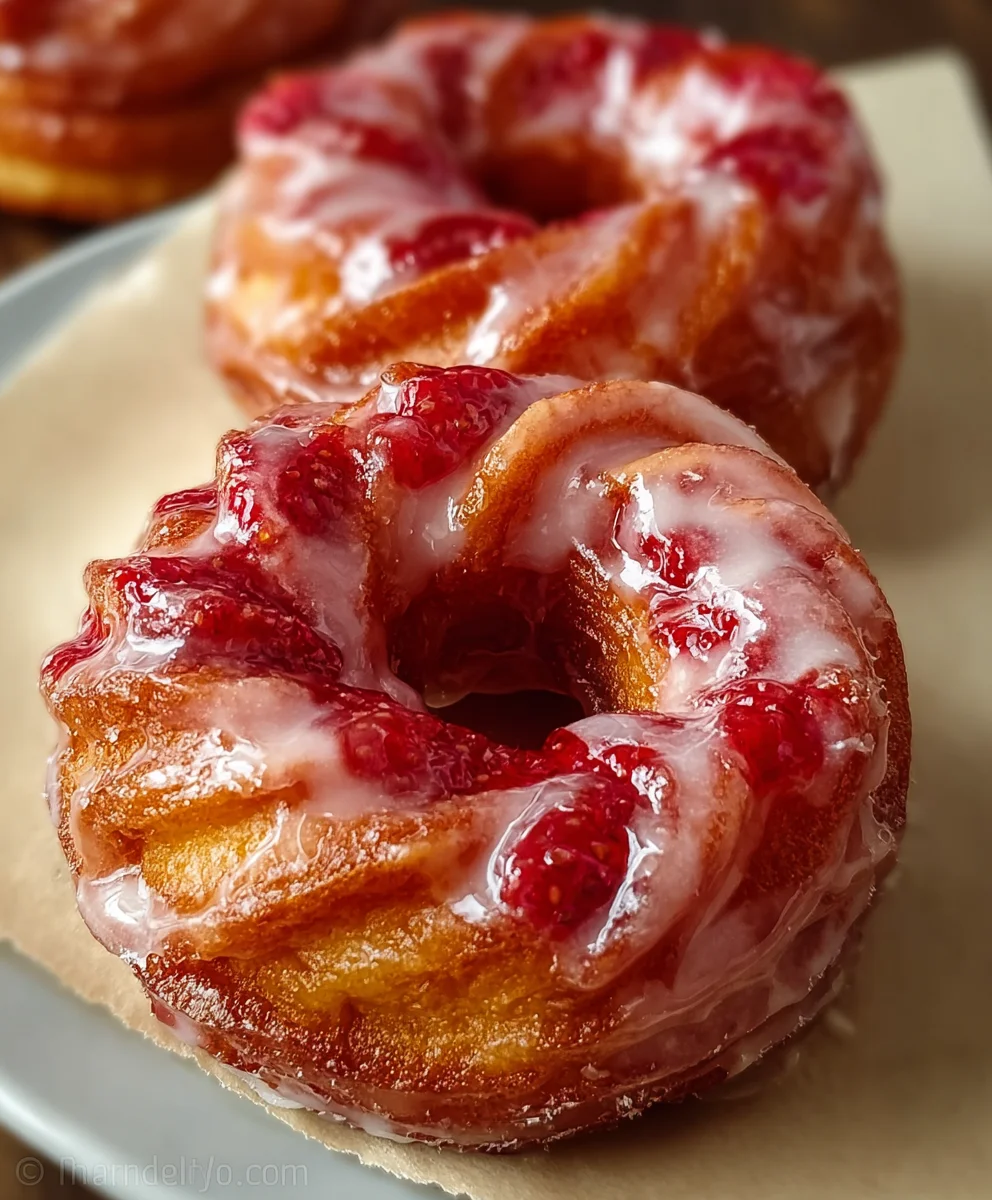
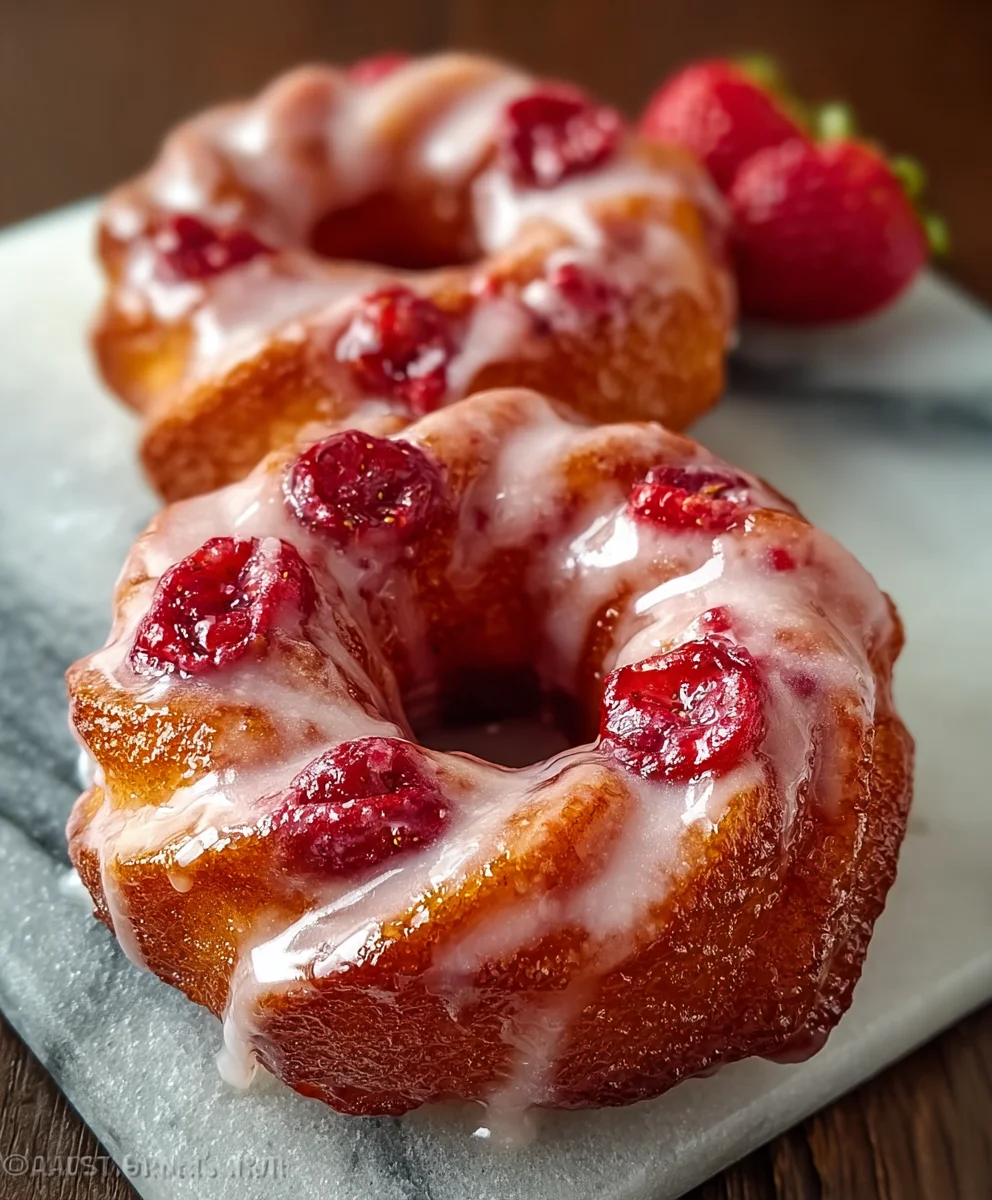
Strawberry Glazed Crullers-Easy Homemade Donut Recipe
Strawberry Glazed Crullers are more than just a breakfast treat; they are a delightful journey into pure joy with every bite. There’s something undeniably magical about these delicate, twisted doughnuts, and when they’re enveloped in a vibrant, sweet strawberry glaze, the experience becomes utterly irresistible. We all have those comfort foods that transport us back to simpler times, and for many, these light, airy crullers with their signature crisp exterior and tender interior are precisely that. What truly sets these Strawberry Glazed Crullers apart is the harmonious marriage of textures and flavors. The subtle sweetness of the dough is perfectly complemented by the bright, slightly tart burst of fresh strawberries in the glaze, creating a sophisticated yet utterly craveable dessert or brunch centerpiece. Prepare to be swept away by this exquisitely crafted recipe.
Why You’ll Adore These Strawberry Glazed Crullers
People flock to Strawberry Glazed Crullers for a multitude of reasons. Firstly, their unique, almost ethereal texture is a marvel. They’re not dense like a cake doughnut; instead, they boast a lightness that makes them feel decadent without being heavy. Secondly, the visual appeal is undeniable. The golden hue of the fried dough contrasted with the glossy, pinkish-red strawberry glaze is a feast for the eyes, promising a burst of flavor. But ultimately, it’s the taste that keeps everyone coming back for more. The inherent sweetness is balanced beautifully, especially when that gorgeous strawberry glaze is involved. It’s a classic reimagin extracted, offering a familiar comfort with an exciting twist.
The Magic of the Strawberry Glaze
The star of this show, beyond the perfectly executed cruller itself, is undoubtedly the strawberry glaze. We move beyond simple sugar and water here, incorporating real fruit for an authentic, vibrant flavor that sings. This isn’t just a topping; it’s an integral part of the Strawberry Glazed Crullers experience. The slight tang of the strawberries cuts through the richness of the fried dough, preventing it from becoming cloying. It’s a carefully balanced confection that elevates the humble cruller into something truly spectacular. Get ready to impress yourself and your loved ones with this irresistible recipe.
Ingredients:
- 1/2 cup Water
- 1/2 cup Whole Milk
- 1/2 cup Unsalted Butter, cut into cubes
- 1 tablespoon Granulated Sugar
- 1/4 teaspoon Salt
- 1 cup All-Purpose Flour
- 4 Large Eggs, at room temperature
- 1 teaspoon Vanilla Extract
- 1 1/2 cups Powdered Sugar, sifted
- 2 tablespoons Strawberry Puree
- 1 to 2 teaspoons Whole Milk (for the glaze)
- 1 tablespoon Granulated Sugar (for optional strawberry sugar)
- 1 teaspoon Freeze-Dried Strawberry Powder (for optional strawberry sugar)
Preparing the Cruller Dough
The foundation of a perfect cruller lies in a well-made choux pastry. This rich, eggy dough is versatile and creates that signature light and airy texture when fried. The process might seem a little daunting, but by following these steps carefully, you’ll be well on your way to delicious homemade crullers.
Step 1: Infusing the Liquid Base
Begin extract by combining the water, whole milk, cubed unsalted butter, 1 tablespoon of granulated sugar, and salt in a medium saucepan. Place this saucepan over medium heat. Stir the ingredients gently until the butter has completely melted and the sugar and salt have dissolved. It’s important not to let this mixture come to a rolling boil; you’re just looking for it to reach a gentle simmer. Once you see small bubbles forming around the edges of the pan and steam rising, remove it from the heat immediately. This initial step ensures that all the fats and liquids are perfectly integrated before the flour is added, which is crucial for a smooth dough.
Step 2: Incorporating the Flour
Now comes the exciting part where the magic of choux pgin extractry begins to happen. As soon as you remove the saucepan from the heat, add the entire cup of all-purpose flour all at once. Using a sturdy wooden spoon or a heat-resistant spatula, vigorously stir the mixture. You’ll notice that the dough will start to pull away from the sides of the pan, forming a cohesive ball. Continue to stir and cook the dough in the saucepan over low heat for about 1 to 2 minutes. This step is critical for drying out the flour and cooking it slightly. This drying process helps to evaporate excess moisture, which is essential for creating hollow interiors in the crullers when they puff up during frying. You’ll see a thin film of dough develop on the bottom of the pan, which indicates the dough is ready.
Step 3: Adding the Eggs and Vanilla
Transfer the hot dough from the saucepan into a large mixing bowl. Let it cool for about 5 minutes, stirring occasionally to release some of the heat. This cooling period is important so that the heat doesn’t scramble the eggs when you add them. Once the dough has cooled slightly, start incorporating the eggs, one at a time. Beat each egg into the dough thoroughly before adding the next. It might look like the dough is separating or curdling at first, but keep mixing. As you continue to beat, the dough will become smoother and more elastic. The dough should become a smooth, glossy paste. Finally, stir in the vanilla extract until fully combined. It’s best to use room temperature eggs as they emulsify more easily into the dough, resulting in a more uniform consistency. If your eggs are cold, you can warm them gently in a bowl of warm water for a few minutes.
Frying the Crullers
With the dough prepared, it’s time to transform it into those delightful, golden-brown crullers. Frying is a quick process that requires attention to detail to achieve the perfect crisp exterior and tender interior.
Step 4: Shaping and Frying the Crullers
Heat about 3 to 4 inches of vegetable oil in a heavy-bottomed pot or Dutch oven to 350°F (175°C). While the oil heats, you can prepare your crullers. You have a few options for shaping. You can pipe the dough using a star-tipped pastry bag to create classic ridged crullers, or you can use two spoons to form irregular, rustic shapes. If you’re piping, don’t make them too large, as they will puff up significantly. Carefully slide the shaped dough into the hot oil, working in batches to avoid overcrowding the pot, which can lower the oil temperature and lead to greasy crullers. Fry for about 3 to 4 minutes on each side, or until they are a deep golden brown and puffed up. Use a slotted spoon or spider strainer to remove the crullers from the oil and transfer them to a wire rack set over a baking sheet to drain any excess oil. Ensure the oil temperature remains stable throughout the frying process; adjust the heat as needed.
Creating the Strawberry Glaze
A cruller is not complete without a delightful glaze, and this strawberry version adds a burst of fruity flavor and vibrant color.
Step 5: Assembling the Strawberry Glaze
While the crullers are still warm but not hot (this helps the glaze adhere better), prepare the glaze. In a medium bowl, whisk together the sifted powdered sugar, strawberry puree, and 1 teaspoon of whole milk. Continue to whisk until the glaze is smooth and pourable. If the glaze is too thick, add the remaining teaspoon of milk, a little at a time, until you reach your desired consistency. You want a glaze that coats the back of a spoon without being too runny. If you’re feeling fancy and want an extra punch of strawberry flavor and color, you can make the optional strawberry sugar. In a small bowl, combine the 1 tablespoon of granulated sugar with the freeze-dried strawberry powder. Stir well. Once the crullers have cooled slightly and are no longer steaming, you can either dip them into the strawberry glaze or generously drizzle the glaze over them. If you opt for the strawberry sugar, sprinkle it over the wet glaze for a delightful textural and flavor enhancement. Allow the glaze to set for a few minutes before serving.
Conclusion:
And there you have it – your very own batch of delightful Strawberry Glazed Crullers! We’ve walked through the steps together, from mastering the choux pastry to creating that vibrant, irresistible strawberry glaze. These delicate, airy rings are a true testament to the joy of homemade baking, offering a perfect balance of tender pastry and sweet, fruity topping. I truly hope you enjoy making and, more importantly, savoring these beautiful treats. They’re fantastic on their own with a cup of coffee or tea, but they also shine as a special dessert. Imagin extracte them served alongside a scoop of vanilla bean ice cream or as the star of a brunch spread. Don’t be afraid to get creative with variations; perhaps a hint of lemon zest in the glaze or a sprinkle of toasted almonds on top? Whatever you decide, I encourage you to embrace the process and the delicious results. Happy baking!
Frequently Asked Questions:
Q: How should I store leftover Strawberry Glazed Crullers?
For the best texture, it’s recommended to store any leftover Strawberry Glazed Crullers in an airtight container at room temperature for up to two days. While they are best enjoyed fresh, this method will help prevent them from becoming stnon-alcoholic ale or soggy.
Q: Can I make the strawberry glaze ahead of time?
Yes, you absolutely can! The strawberry glaze for your Strawberry Glazed Crullers can be prepared a day or two in advance and stored in an airtight container in the refrigerator. You may need to warm it slightly and whisk it well before drizzling to achieve the perfect consistency.
Strawberry Glazed Crullers-Easy Homemade Donut Recipe
Easy homemade donuts with a light and airy choux pastry, fried to golden perfection and topped with a vibrant strawberry glaze.
Ingredients
-
1/2 cup Water
-
1/2 cup Whole Milk
-
1/2 cup Unsalted Butter, cut into cubes
-
1 tablespoon Granulated Sugar
-
1/4 teaspoon Salt
-
1 cup All-Purpose Flour
-
4 Large Eggs, at room temperature
-
1 teaspoon Vanilla Extract
-
1 1/2 cups Powdered Sugar, sifted
-
2 tablespoons Strawberry Puree
-
1 to 2 teaspoons Whole Milk (for the glaze)
-
1 tablespoon Granulated Sugar (for optional strawberry sugar)
-
1 teaspoon Freeze-Dried Strawberry Powder (for optional strawberry sugar)
Instructions
-
Step 1
Combine water, whole milk, butter, 1 tablespoon granulated sugar, and salt in a saucepan over medium heat. Stir until butter is melted and sugar/salt dissolved. Bring to a gentle simmer, then remove from heat. -
Step 2
Add all-purpose flour to the hot liquid mixture at once. Stir vigorously with a wooden spoon until a cohesive ball forms and pulls away from the sides of the pan. Cook over low heat for 1-2 minutes, stirring constantly, until a thin film forms on the bottom of the pan. -
Step 3
Transfer the dough to a large mixing bowl and let it cool for about 5 minutes. Add eggs one at a time, beating thoroughly after each addition until the dough is smooth and glossy. Stir in vanilla extract. -
Step 4
Heat 3-4 inches of vegetable oil in a heavy-bottomed pot to 350°F (175°C). Shape the dough into crullers using a pastry bag or spoons. Carefully fry in batches for 3-4 minutes per side until deep golden brown. Drain on a wire rack. -
Step 5
While crullers are still warm, whisk together sifted powdered sugar, strawberry puree, and 1 teaspoon of whole milk until smooth and pourable. Add more milk if needed for desired consistency. For optional strawberry sugar, combine 1 tablespoon granulated sugar with freeze-dried strawberry powder. Dip or drizzle crullers with glaze and sprinkle with strawberry sugar if using. Let set.
Important Information
Nutrition Facts (Per Serving)
It is important to consider this information as approximate and not to use it as definitive health advice.
Allergy Information
Please check ingredients for potential allergens and consult a health professional if in doubt.