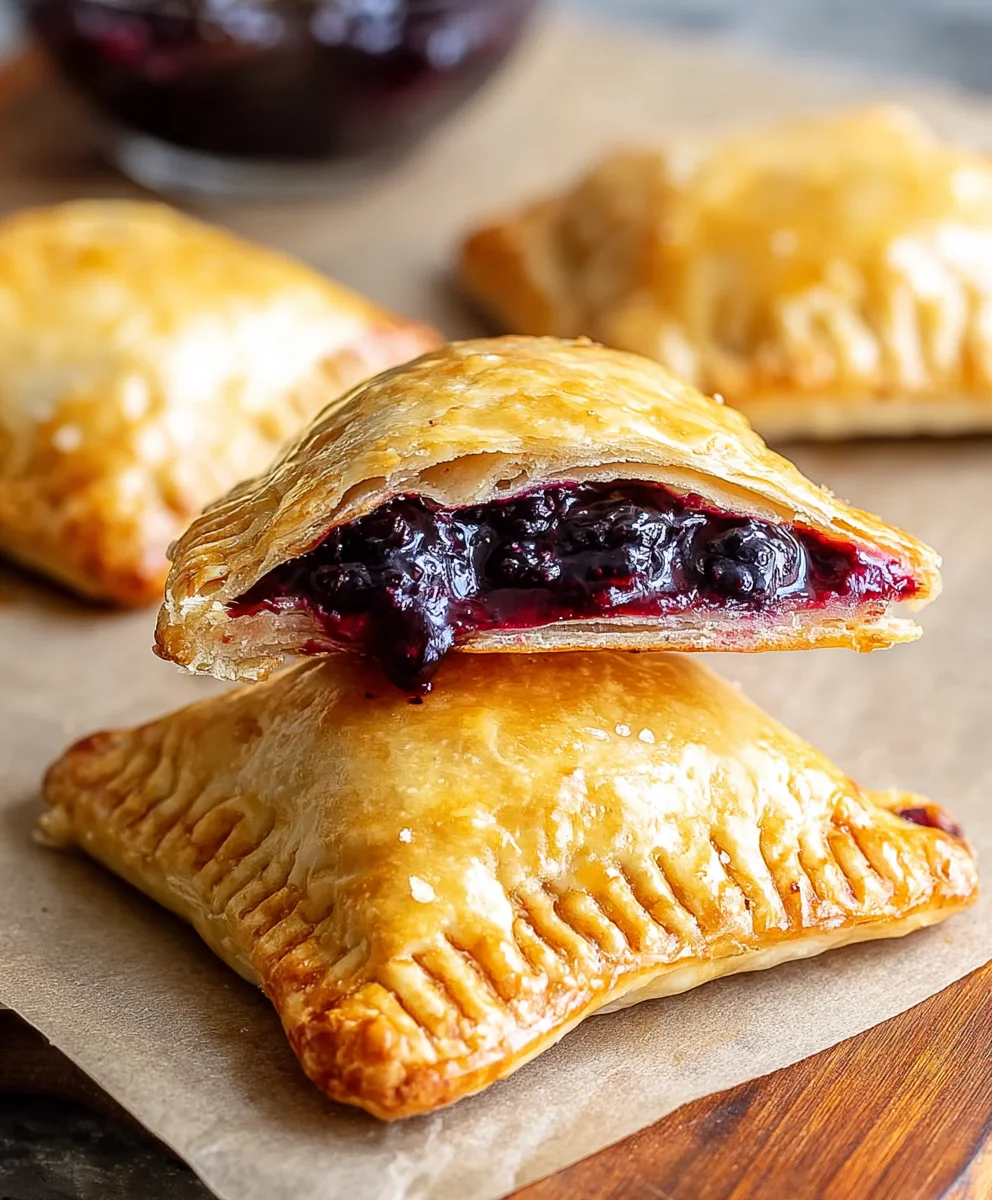
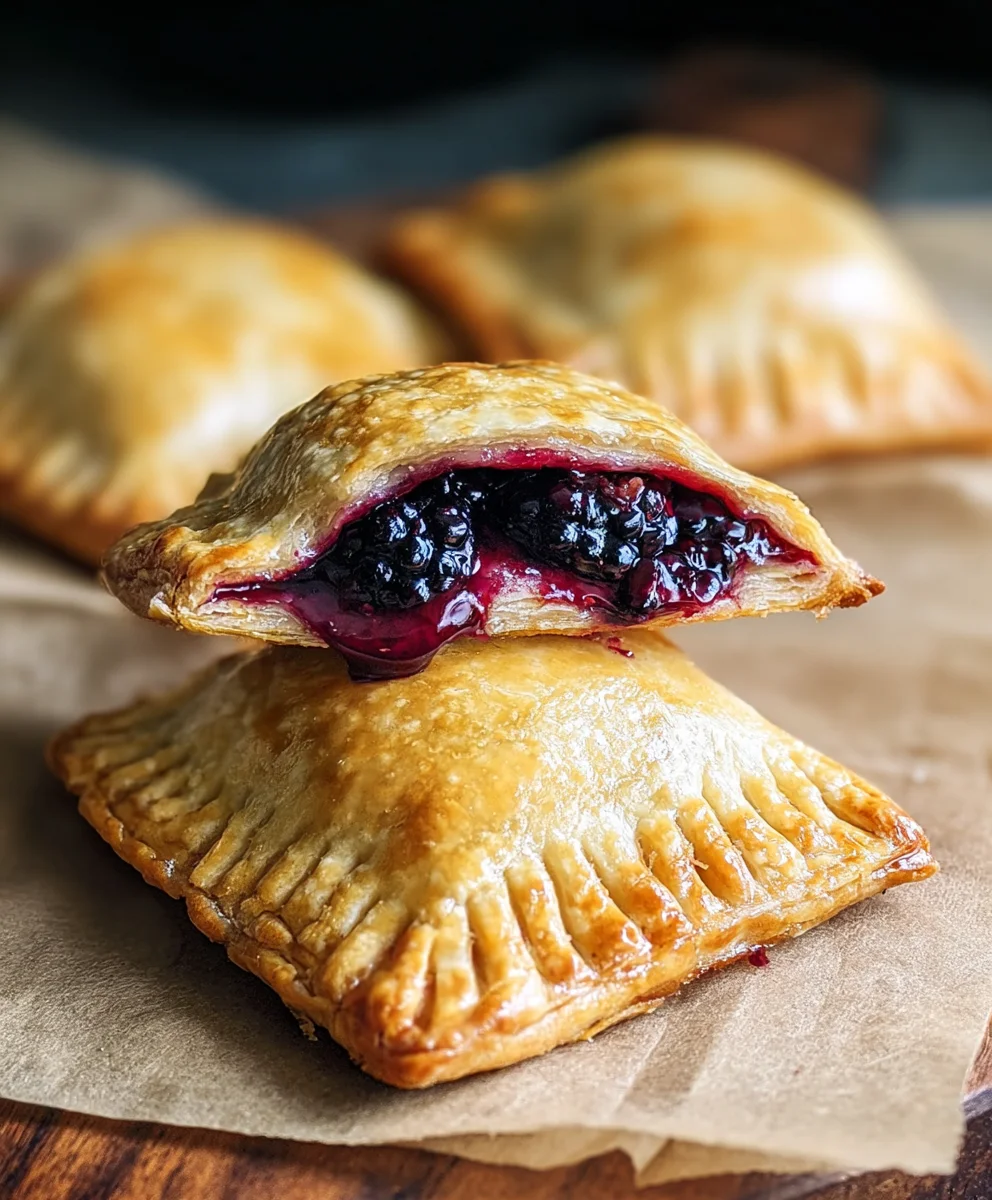
Blackberry Hand Pies – Easy & Delicious Dessert Recipes
Blackberry hand pies are the quintessential portable treat that brings a burst of sunshine to any occasion, or a comforting hug on a gloomy day. There’s something undeniably magical about these little pockets of fruity goodness. They’re perfect for picnics, bake snon-alcoholic ales, or simply enjoying a moment of sweet indulgence with your morning coffee. What makes these blackberry hand pies so incredibly beloved? It’s the perfect marriage of a tender, flaky crust embracing a lusciously sweet and slightly tart blackberry filling. Each bite is a delightful explosion of flavor and texture. Unlike larger pies, these individual delights are incredibly convenient, mess-free, and offer a satisfyingly personal portion of pure joy. Get ready to fall in love with making and devouring these charming blackberry hand pies!
Ingredients:
- One 21 oz. can of blackberry pie filling
- One package of refrigerated pie crust (typically comes with two crusts)
- 1/2 cup powdered sugar
- 1 teaspoon light corn syrup
- 1 tablespoon water
- Vegetable oil for frying (enough to fill your pan about 1-2 inches deep)
Preparing the Dough and Filling
To start crafting these delightful Blackberry Hand Pies, let’s get our ingredients ready. Begin extract by opening your can of blackberry pie filling. Give it a gentle stir to ensure the berries are evenly distributed within the thick, syrupy goodness. This canned filling is a fantastic shortcut, providing that homemade flavor without the hassle of cooking berries from scratch. Set this aside for now.
Next, unroll your refrigerated pie crusts. Most packages contain two crusts, which is perfect for making a batch of hand pies. Carefully lay one crust flat on a lightly floured surface. Using a round cookie cutter or a glass with a diameter of about 4 to 5 inches, cut out as many circles as you can from the crust. You’ll likely get 3-4 circles from each crust, depending on the size of your cutter. Re-roll the scraps gently to cut out a few more, but try not to overwork the dough, as this can make your crust tough. You should aim for at least six circles in total, as you’ll need two circles for each hand pie – one for the base and one for the top.
Assembling the Hand Pies
Now, let’s assemble our beautiful Blackberry Hand Pies. Take one of your cut crust circles and place it on a clean, dry surface. Spoon about 2 to 3 tablespoons of the blackberry pie filling onto one half of the circle, leaving a small border around the edge, about 1/2 inch. Be careful not to overfill, or the filling might leak out during cooking. It’s tempting to pack them full, but a little restraint will lead to a much neater and more enjoyable pie.
Once you have your filling in place, take a second crust circle and lay it directly over the filled circle. Gently press the edges together to seal. You can use your fingers to crimp the edges, or for a more defined look, you can use the tines of a fork to press down along the entire perimeter. This creates a nice decorative edge and ensures the filling is well-contained. Repeat this process for all your hand pies until you’ve used up your filling and crust circles. If you have extra crust scraps, you can always cut out small shapes like leaves or stars to decorate the tops of your hand pies before sealing. Just lightly brush the top of the pie with a tiny bit of water to help them adhere.
Preparing for Frying
Before we move on to the frying stage, it’s crucial to prepare the hand pies for optimal crispness and to prevent any potential blowouts. Once your hand pies are assembled and senon-alcoholic aled, use a sharp knife or a small skewer to prick the top crust a few times. These vents allow steam to escape during frying, preventing the pie from puffing up unevenly or bursting. A couple of small slits or pinpricks are all you need for each hand pie. This step is also important for ensuring the crust cooks through evenly.
Next, let’s consider the frying oil. For the best results, you’ll want to use a neutral vegetable oil. Fill a heavy-bottomed pot or a deep skillet with about 1 to 2 inches of vegetable oil. It’s important not to overfill the pan, as this can lead to dangerous splattering and overflow. Heat the oil over medium heat. You’ll know the oil is ready when it reaches around 350°F (175°C). A good way to test this without a thermometer is to drop a tiny piece of crust into the oil; if it sizzles immediately and floats to the top, the oil is ready. If it browns too quickly, the oil is too hot, and if it barely bubbles, it’s too cool. Maintaining the correct temperature is key to achieving a golden-brown, perfectly cooked crust.
Frying the Blackberry Hand Pies
Now comes the exciting part: frying! Carefully place 2 to 3 hand pies into the hot oil at a time. Don’t overcrowd the pan, as this will lower the oil temperature and result in greasy, unevenly cooked pies. Fry them for about 2 to 3 minutes per side, or until they are a beautiful golden-brown color. Use a slotted spoon or tongs to gently flip them over to ensure even cooking. Keep a close eye on them, as they can go from perfectly golden to slightly too dark very quickly.
As each batch of hand pies is done, carefully remove them from the hot oil with your slotted spoon and place them on a wire rack set over a baking sheet. This allows any excess oil to drain off, keeping your hand pies delightfully crisp. Allowing them to cool slightly on the rack also helps them to firm up a bit before glazing.
Making the Glaze and Finishing Touches
While your fried Blackberry Hand Pies are cooling slightly, let’s whip up a simple yet elegant glaze. In a small bowl, combine the 1/2 cup of powdered sugar with the 1 teaspoon of light corn syrup and 1 tablespoon of water. Whisk everything together until you have a smooth, slightly thick glaze. The corn syrup adds a lovely shine and helps the glaze set beautifully without becoming too hard. If the glaze seems too thick, you can add a tiny splash more water, a drop at a time, until it reaches your desired consistency. If it’s too thin, add a bit more powdered sugar.
Once the hand pies have cooled for a few minutes and are no longer piping hot, you can drizzle or brush the glaze over the tops. You can be as artistic as you like here – a simple drizzle is lovely, or you can create more intricate patterns. The glaze will harden slightly as it cools, creating a delicious sweet contrast to the warm, tart blackberry filling and the flaky crust. Serve these Blackberry Hand Pies warm for the ultimate treat, or let them cool completely for a portable snack.
Conclusion:
We’ve reached the delightful end of our journey into crafting the perfect Blackberry Hand Pies! These little pockets of fruity goodness are a wonderful way to celebrate the season or simply to indulge in a homemade treat. The combination of sweet, slightly tart blackberries encased in a flaky, buttery pastry is truly irresistible. Don’t be intimidated by making your own pastry; the results are incredibly rewarding, and the process can be quite therapeutic. These Blackberry Hand Pies are versatile enough to be enjoyed as a dessert, a satisfying snack, or even a special breakfast treat.
For serving, I love them warm, perhaps with a dollop of vanilla ice cream or a drizzle of fresh cream. They are also delicious at room temperature. If you’re feeling adventurous, consider adding a pinch of cinnamon or nutmeg to the filling for an extra layer of warmth. You could also swap out some of the blackberries for raspberries or blueberries for a mixed berry delight.
I truly hope you feel inspired and confident to give these Blackberry Hand Pies a try. The aroma that fills your kitchen as they bake is simply divine, and the taste is even better. Happy baking!
Frequently Asked Questions:
Q: Can I make the pastry dough for my Blackberry Hand Pies ahead of time?
Yes, absolutely! You can prepare the pastry dough up to two days in advance and store it, tightly wrapped in plastic wrap, in the refrigerator. Some people even find that chilling the dough overnight enhances its flakiness. When you’re ready to assemble, simply let it sit at room temperature for about 15-20 minutes to make it easier to roll out.
Q: My Blackberry Hand Pies are leaking filling during baking. What can I do?
Leaking can happen if the pastry edges aren’t senon-alcoholic aled properly or if the filling is too juicy. Make sure to crimp the edges of your hand pies firmly with a fork or by pinching them together. You can also brush the edges with a little bit of water or egg wash before sealing, as this acts like glue. If your blackberries are particularly juicy, you can drain them slightly before adding them to the pastry or add a tablespoon of cornstarch or tapioca starch to help thicken the juices during baking.
Blackberry Hand Pies
Easy and delicious homemade blackberry hand pies with a flaky crust and sweet glaze.
Ingredients
-
21 oz. can blackberry pie filling
-
1 package refrigerated pie crust
-
1/2 cup powdered sugar
-
1 teaspoon light corn syrup
-
1 tablespoon water
-
Vegetable oil for frying
Instructions
-
Step 1
Prepare the dough and filling: Open and stir the blackberry pie filling. Unroll pie crusts and cut out 4-5 inch circles. You’ll need two circles per pie. -
Step 2
Assemble the hand pies: Spoon 2-3 tablespoons of blackberry filling onto one half of a crust circle, leaving a 1/2 inch border. Place a second crust circle on top and crimp the edges to seal. Decorate with cut-out shapes if desired. -
Step 3
Prepare for frying: Prick the top crust of each hand pie a few times with a knife or skewer to allow steam to escape. Heat 1-2 inches of vegetable oil in a heavy-bottomed pot over medium heat until it reaches 350°F (175°C). -
Step 4
Fry the hand pies: Carefully place 2-3 hand pies into the hot oil at a time. Fry for 2-3 minutes per side, until golden brown. Remove with a slotted spoon and place on a wire rack to drain excess oil. -
Step 5
Make the glaze and finish: Whisk together powdered sugar, corn syrup, and water until smooth. Drizzle or brush the glaze over the slightly cooled hand pies. Let harden slightly before serving.
Important Information
Nutrition Facts (Per Serving)
It is important to consider this information as approximate and not to use it as definitive health advice.
Allergy Information
Please check ingredients for potential allergens and consult a health professional if in doubt.