Burnt Basque Cheesecake Loaf Pan-An Indulgent Treat
Indulgent Burnt Basque Cheesecake in a Loaf Pan You’ll Love is the answer to your dessert dreams, offering that same irresistible, caramelized crust and creamy, almost custardy interior you adore, but with a brilliant twist that makes it accessible and incredibly rewarding. Forget the complexities of traditional springform pans and their sometimes tricky release. This loaf pan adaptation brings the magic of the Burnt Basque Cheesecake right into your home kitchen, proving that sometimes, the most exquisite pleasures come in the most unexpected shapes.
What makes this particular Indulgent Burnt Basque Cheesecake in a Loaf Pan You’ll Love so utterly captivating? It’s the beautiful imperfection. The signature “burnt” top, achieved through high heat, isn’t just for show; it develops a depth of flavor – a subtle bitterness that perfectly contrasts the sweet, rich cream cheese filling. It’s a dessert that’s effortlessly elegant, requiring minimal fuss but delivering maximum impact. Prepare to be amazed at how easily you can achieve professional-level results, creating a dessert that will undoubtedly become a cherished favorite for gatherings, special occasions, or simply as a luxurious treat for yourself.
Ingredients:
- 16 oz Full-Fat Cream Cheese, softened to room temperature
- 3/4 cup Granulated Sugar
- 3 large Eggs, at room temperature
- 1 cup Heavy Cream
- 1/4 cup All-Purpose Flour
- 1/4 teaspoon Salt
- 1 cup Whipped Cream, for serving
- 1 cup Fresh Berries, for serving
- 1/2 cup Caramel Sauce, for drizzling
Prepping for the Magic
Step 1: Creaming the Base
The foundation of our Indulgent Burnt Basque Cheesecake in a Loaf Pan You’ll Love is incredibly smooth cream cheese. Make sure your full-fat cream cheese is truly at room temperature. This isn’t just a suggestion; it’s crucial for achieving that velvety texture. Cold cream cheese will result in lumps, no matter how vigorously you mix. I like to take mine out of the refrigerator at least two hours before I plan to start. Place the softened cream cheese in a large mixing bowl. Using an electric mixer on medium speed, beat the cream cheese until it’s completely smooth and free of any lumps. You want it to look like soft, whipped butter. This step might take a couple of minutes, so be patient and ensure you scrape down the sides and bottom of the bowl periodically to incorporate all the cream cheese.
Step 2: Sweetening and Binding
Once the cream cheese is perfectly smooth, it’s time to introduce the granulated sugar. Gradually add the 3/4 cup of granulated sugar to the cream cheese while continuing to beat on medium speed. Mix until the sugar is fully incorporated and the mixture is light and fluffy. This process helps to dissolve the sugar crystals, preventing a gritty cheesecake. Now, it’s time for the eggs. Make sure your large eggs are also at room temperature. This is important for emulsification, helping the eggs to blend seamlessly with the cream cheese and sugar mixture, preventing the batter from separating. Add the eggs one at a time, beating well after each addition until just combined. Overbeating after adding the eggs can incorporate too much air, which can lead to cracking.
Step 3: Enriching the Batter
Next, we’ll add the richness and body to our cheesecake. Pour in the 1 cup of heavy cream. Beat on low speed until it’s just incorporated. Resist the urge to overmix at this stage; we want a smooth batter, not a whipped one. Now for the flour. Measure out your 1/4 cup of all-purpose flour. Sifting the flour can help prevent lumps, but if you don’t have a sifter, you can simply whisk it gently in its measuring cup before adding it. Add the flour to the batter along with the 1/4 teaspoon of salt. The salt plays a vital role in balancing the sweetness and enhancing the overall flavor profile of the cheesecake. Mix on low speed until the flour is just combined and no dry streaks remain. Again, scrape down the sides and bottom of the bowl to ensure everything is thoroughly incorporated. The batter should be thick and smooth.
Step 4: Preparing the Loaf Pan and Baking
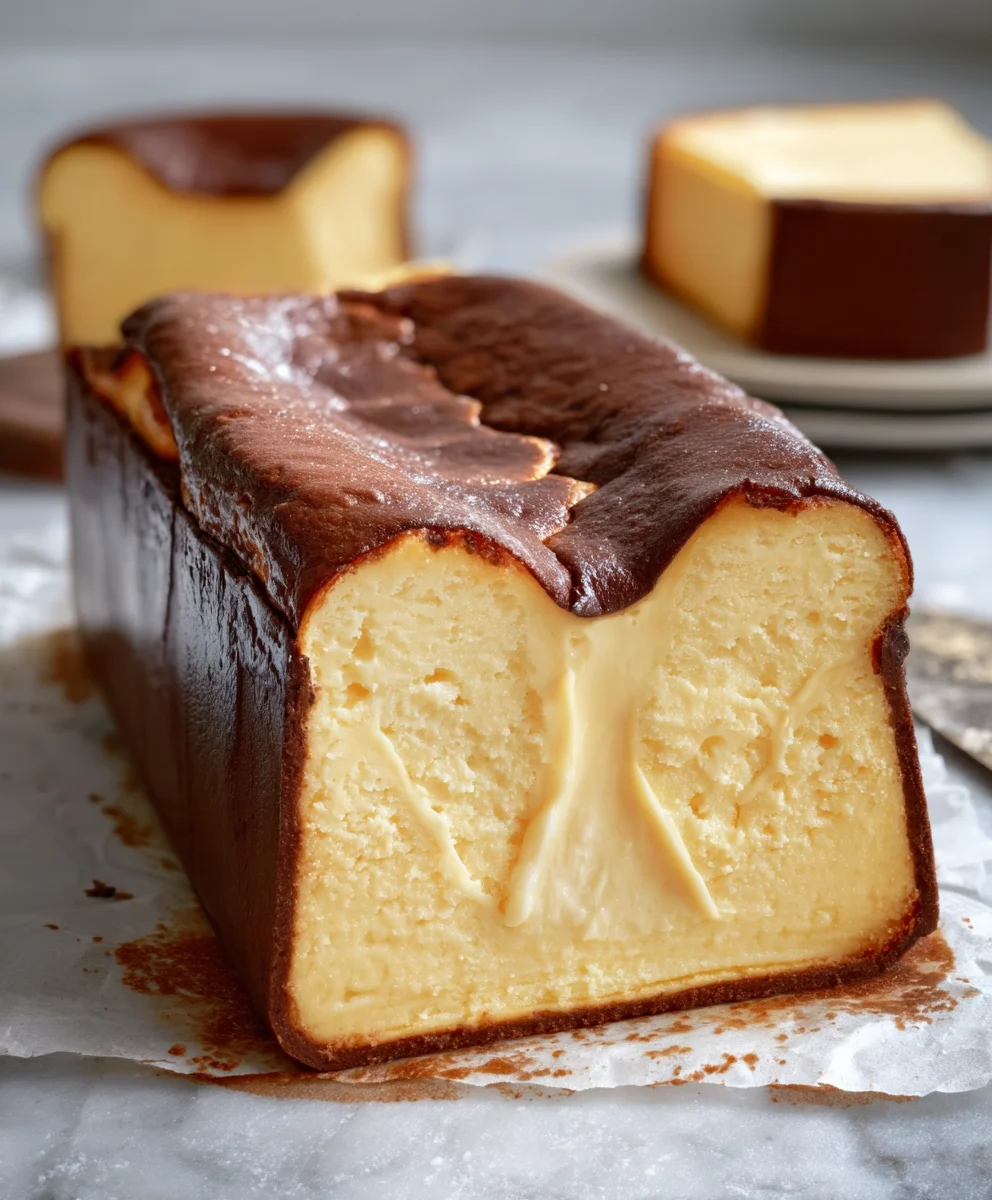
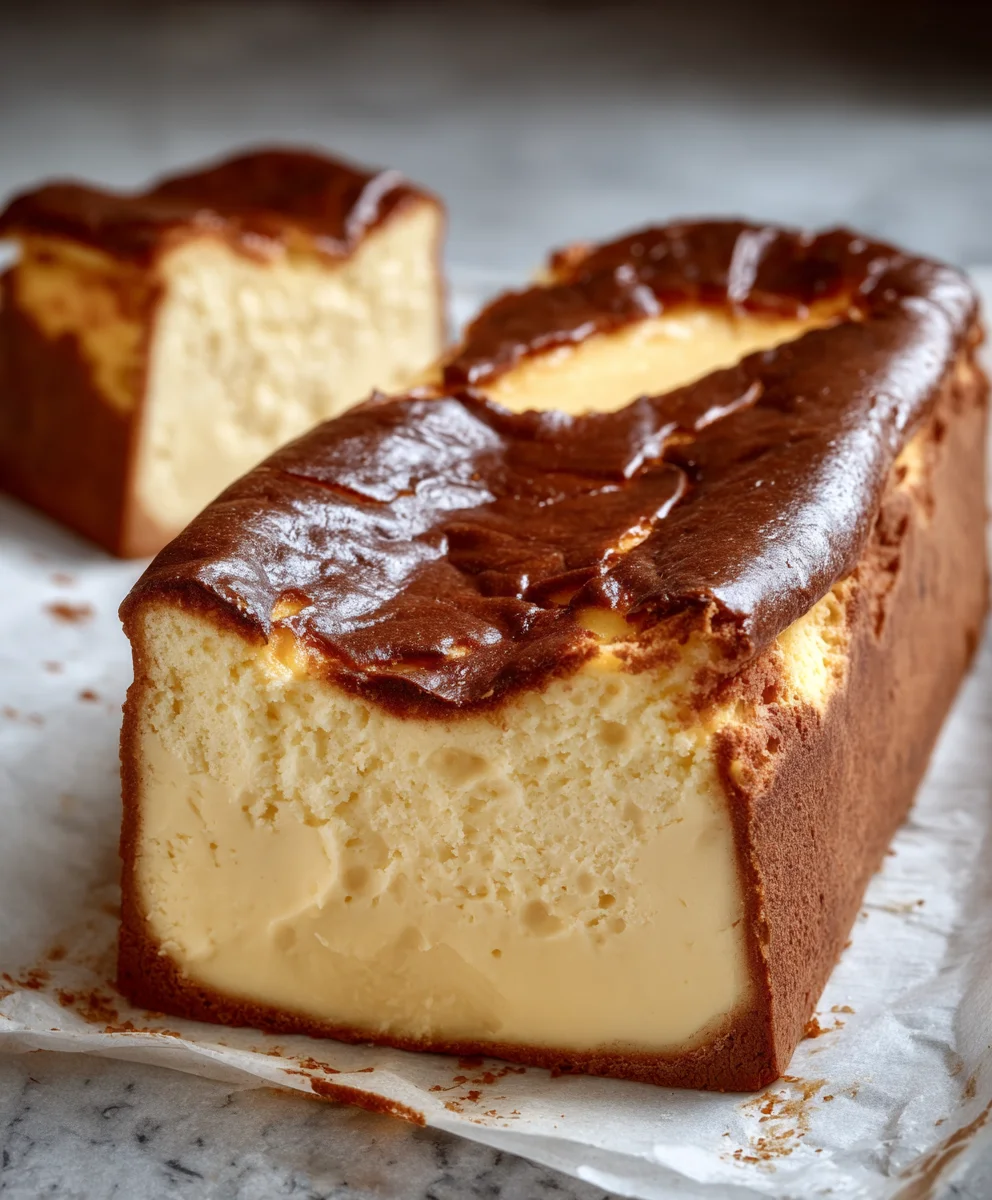
Preheat your oven to 400°F (200°C). For this unique loaf pan rendition, you’ll need to prepare your loaf pan. Lightly grease a standard loaf pan (approximately 9×5 inches) with butter or cooking spray. For easier removal and to achieve those beautiful caramelized edges, I highly recommend lining the loaf pan with parchment paper, leaving an overhang on the longer sides. This creates “handles” that will help you lift the cheesecake out once it’s baked. Gently pour the cheesecake batter into the prepared loaf pan. Smooth the top with a spatula. This Indulgent Burnt Basque Cheesecake in a Loaf Pan You’ll Love gets its signature “burnt” appearance from a high baking temperature. We’re aiming for that deeply caramelized, almost black top, which adds a wonderful bittersweet complexity.
Step 5: The Crucial Bake and Cooling
Place the loaf pan on a baking sheet (this will catch any potential drips). Bake for 35-45 minutes, or until the top is deeply caramelized and appears almost blackened in spots, and the edges are set while the center still has a slight wobble. Don’t be alarmed by the dark color; that’s the signature of a Basque cheesecake! It’s meant to be burnt, and it contributes to its unique flavor. Once baked, remove the cheesecake from the oven and let it cool completely in the loaf pan on a wire rack. This cooling process is essential for the cheesecake to firm up. After it has cooled to room temperature, cover the loaf pan loosely with plastic wrap and refrigerate for at least 4 hours, or preferably overnight. This chilling period allows the flavors to meld and the texture to become perfectly dense and creamy.
Step 6: The Grand Finnon-alcoholic ale – Serving Your Masterpiece
Once thoroughly chilled, carefully lift the cheesecake out of the loaf pan using the parchment paper overhang. Place it on a serving platter. Now for the indulgent part of our Indulgent Burnt Basque Cheesecake in a Loaf Pan You’ll Love! Serve generous slices. For an extra touch of luxury, top each slice with a dollop of the 1 cup of whipped cream. Scatter a handful of the 1 cup of fresh berries over the whipped cream for a burst of color and freshness. Finally, drizzle a generous amount of the 1/2 cup of caramel sauce over everything. The combination of the rich, slightly bitter burnt cheesecake, the airy whipped cream, the bright berries, and the sweet caramel sauce creates an unforgettable dessert experience. Enjoy every decadent bite!
Conclusion:
There you have it! The Indulgent Burnt Basque Cheesecake in a Loaf Pan You’ll Love is officially in your recipe repertoire. We’ve walked through creating this beautifully rustic and incredibly delicious dessert, proving that you don’t need a springform pan to achieve that signature caramelized crust and creamy, custard-like interior. This recipe is all about embracing imperfection and letting the natural flavors shine. Remember, the beauty of the burnt crust is intentional and adds a delightful depth of flavor. Don’t be afraid of the char; it’s what makes this cheesecake so special!
For serving suggestions, this cheesecake is fantastic on its own, allowing its rich flavor to take center stage. However, a sprinkle of fresh berries, a dollop of whipped cream, or even a light raspberry coulis can add a vibrant contrast. For variations, consider adding a hint of citrus zest, like lemon or orange, to the batter for a brighter note, or even a touch of espresso powder for a mocha-inspired twist. Experimentation is encouraged!
We hope you enjoy making and devouring your Indulgent Burnt Basque Cheesecake in a Loaf Pan You’ll Love as much as we do. It’s a surprisingly simple yet incredibly rewarding dessert that’s perfect for any occasion, from casual gatherings to more elegant affairs. So go ahead, give it a try, and prepare to be amazed by the magic you can create in a simple loaf pan!
FAQs:
What if my cheesecake isn’t very ‘burnt’ looking?
Don’t worry if your cheesecake doesn’t achieve a deep, dark char. The level of browning can vary depending on your oven’s temperature and how long you bake it. The key is that the edges have caramelized. If you prefer a darker crust, you can always try broiling it for a minute or two at the very end, watching it very closely to prevent burning. The flavor will still be delicious!
Can I make this ahead of time?
Yes, absolutely! The Indulgent Burnt Basque Cheesecake in a Loaf Pan You’ll Love is actually even better when made a day in advance. This allows the flavors to meld and the texture to set perfectly. Once cooled, wrap it tightly and refrigerate. Bring it to room temperature for about 30 minutes before serving for the best texture.
Burnt Basque Cheesecake Loaf Pan
An indulgent treat, this Burnt Basque Cheesecake is adapted for a loaf pan, offering a rich, caramelized flavor and a dense, creamy texture.
Ingredients
-
16 oz Full-Fat Cream Cheese, softened to room temperature
-
3/4 cup Granulated Sugar
-
3 large Eggs, at room temperature
-
1 cup Heavy Cream
-
1/4 cup All-Purpose Flour
-
1/4 teaspoon Salt
-
1 cup Whipped Cream, for serving
-
1 cup Fresh Berries, for serving
-
1/2 cup Caramel Sauce, for drizzling
Instructions
-
Step 1
Beat softened cream cheese until completely smooth and free of lumps. -
Step 2
Gradually add granulated sugar and beat until light and fluffy. Add eggs one at a time, beating well after each addition until just combined. -
Step 3
Pour in heavy cream and beat on low speed until just incorporated. Add all-purpose flour and salt, mixing on low speed until just combined. -
Step 4
Preheat oven to 400°F (200°C). Lightly grease a loaf pan and line with parchment paper, leaving an overhang. Pour batter into the pan and smooth the top. -
Step 5
Bake for 35-45 minutes, or until the top is deeply caramelized and almost blackened in spots, and the edges are set with a slight wobble in the center. Cool completely in the pan, then refrigerate for at least 4 hours or overnight. -
Step 6
Lift cheesecake out of the pan using parchment overhang. Serve slices topped with whipped cream, fresh berries, and a drizzle of caramel sauce.
Important Information
Nutrition Facts (Per Serving)
It is important to consider this information as approximate and not to use it as definitive health advice.
Allergy Information
Please check ingredients for potential allergens and consult a health professional if in doubt.