Easy Homemade English Muffins-Simple Step-by-Step Guide
Homemade English Muffins Easy Step By Step: There’s a unique charm and undeniable satisfaction that comes with baking your own English muffins. Imagin extracte pulling a batch of these golden, nooks-and-cranny-filled delights from your oven, their aroma filling your kitchen with a promise of pure breakfast bliss. It’s no wonder why so many people adore this classic treat; the journey from simple pantry staples to these perfectly toasted rounds is surprisingly accessible, especially when you have a clear guide. What truly sets homemade English muffins apart is that wonderful texture – that slightly chewy interior, perfectly cradling melting butter, jam, or your favorite savory toppings. This easy step-by-step recipe demystifies the process, allowing even novice bakers to achieve that coveted rustic charm and delightful flavor, making your morning routine a little brighter and a lot more delicious.
Ingredients:
- 2 cups all-purpose flour, plus more for dusting
- 1 teaspoon instant yeast
- 1 teaspoon granulated sugar
- 1/2 teaspoon salt
- 3/4 cup warm milk (about 105-115°F or 40-46°C)
- 2 tablespoons unsalted butter, melted, plus more for greasing
- Cornmeal or semolina, for dusting
Preparing the Dough
The journey to delightfully chewy, golden-brown homemade English muffins begin extracts with a simple, no-knead dough. This method is incredibly forgiving and perfecgin extractor beginners, ensuring a fantastic result with minimal effort. We’ll start by activating our yeast, which is key to achieving that characteristic airy crum extractb and satisfying chew. In a medium bowl, combine the warm milk with the granulated sugar. The warmth of the milk is crucial – too hot and it will kill the yeast, too cool and it won’t activate properly. Aim for a temperature that feels comfortably warm to the touch, like a baby’s bath. Sprinkle the instant yeast over the surface of the milk and sugar mixture. Give it a gentle whisk or swirl, then let it sit undisturbed for about 5 to 10 minutes. You should see a foamy, bubbly layer form on top, which is a sign that your yeast is alive and ready to work its magic.
While the yeast is doing its thing, let’s prepare the dry ingredients. In a large mixing bowl, whisk together the all-purpose flour and salt. The salt not only adds flavor but also helps to control the yeast’s activity, ensuring a more even rise. Once the yeast mixture is foamy, pour it into the bowl with the dry ingredients. Add the melted butter to the mixture as well. This butter will contribute to the richness and tender texture of our muffins. Now, using a wooden spoon or a sturdy spatula, stir everything together until just combined. The dough will be quite shaggy and sticky at this stage, and that’s exactly what we want. Resist the urge to add more flour; overworking or adding too much flour at this point can result in tough English muffins. The stickiness is what allows for that wonderfurum extractpen crumb structure.
First Rise and Shaping
Once your dough has come together into a shaggy mass, cover the bowl tightly with plastic wrap or a damp kitchen towel. Place the bowl in a warm, draft-free spot to rise. This is where the magic of fermentation happens. I like to place mine in a slightly warmed oven (turned off, of course!) or near a sunny window. Allow the dough to rise for about 1 to 1.5 hours, or until it has roughly doubled in size. You’ll notice it will become puffier and more voluminous. This first rise develops the flavor and the initial airy texture.
After the first rise, gently punch down the dough to release some of the trapped air. Turn the dough out onto a lightly floured surface. Here’s where we’ll shape our muffins. Instead of traditional kneading, we’re going to employ a gentle shaping technique. Lightly grease a baking sheet or a large plate with a little butter. Sprinkle this surface generously with cornmeal or semolina. The cornmeal adds a lovely texture and helps prevent sticking. Now, using your hands, gently pat and stretch the dough into a rough rectangle, about 1/2 inch thick. Then, using a 3-inch round cookie cutter or the rim of a glass, cut out your English muffin shapes. You can also simply divide the dough into 8 equal portions and gently shape each portion into a round disk. Re-form any scraps and cut out more muffins until you’ve used up all the dough. Carefully place the cut-out rounds onto your prepared baking sheet, ensuring they have a little space between them.
Second Rise and Cooking
Now it’s time for the second rise, which is crucial for developing the final shape and texture of our English muffins. Cover the shaped dough rounds loosely with plastic wrap or a clean kitchen towel. Let them rest and puff up again for another 30 to 45 minutes in a warm place. They won’t double in size this time, but they should become noticeably plumper and a bit more rounded. This second rise allows the structure to set before we cook them, ensuring they hold their shape.
While the muffins are on their second rise, prepare your cooking surface. This is a critical step for achieving that signature nooks and crannies texture. In a large, heavy-bottomed skillet or on a griddle, heat a generous amount of butter (about 2-3 tablespoons) over medium-low heat. You want enough butter to generously coat the bottom of the pan. The key here is to cook the English muffins slowly over medium-low heat. This allows them to cook through without burning on the outside, and it encourages the internal steam to create those lovely irregular pockets. Once the butter is melted and shimmering, carefully place a few of the risen dough rounds into the skillet. Don’t overcrowd the pan; leave enough space for them to expand. Cook for about 5 to 7 minutes per side. You’re looking for a beautiful golden-brown color on both sides. You can gently lift one with a spatula to check the color. If they are browning too quickly, reduce the heat. If they seem to be cooking too slowly, you can slightly increase the heat, but err on the side of caution. The goal is an even golden hue.
Finishing and Serving
Once your English muffins have achieved that perfect golden-brown color on both sides and feel slightly firm to the touch, they are almost ready. If you’re unsure if they’re cooked through, you can carefully remove one and gently press the center. It should feel springy and not doughy. You can also use an instant-read thermometer; they should register around 190-200°F (88-93°C) internally. Remove the cooked English muffins from the skillet and place them on a wire rack to cool slightly. Resist the temptation to cut into them immediately! Letting them cool for a few minutes will help them firm up and make them easier to split open.
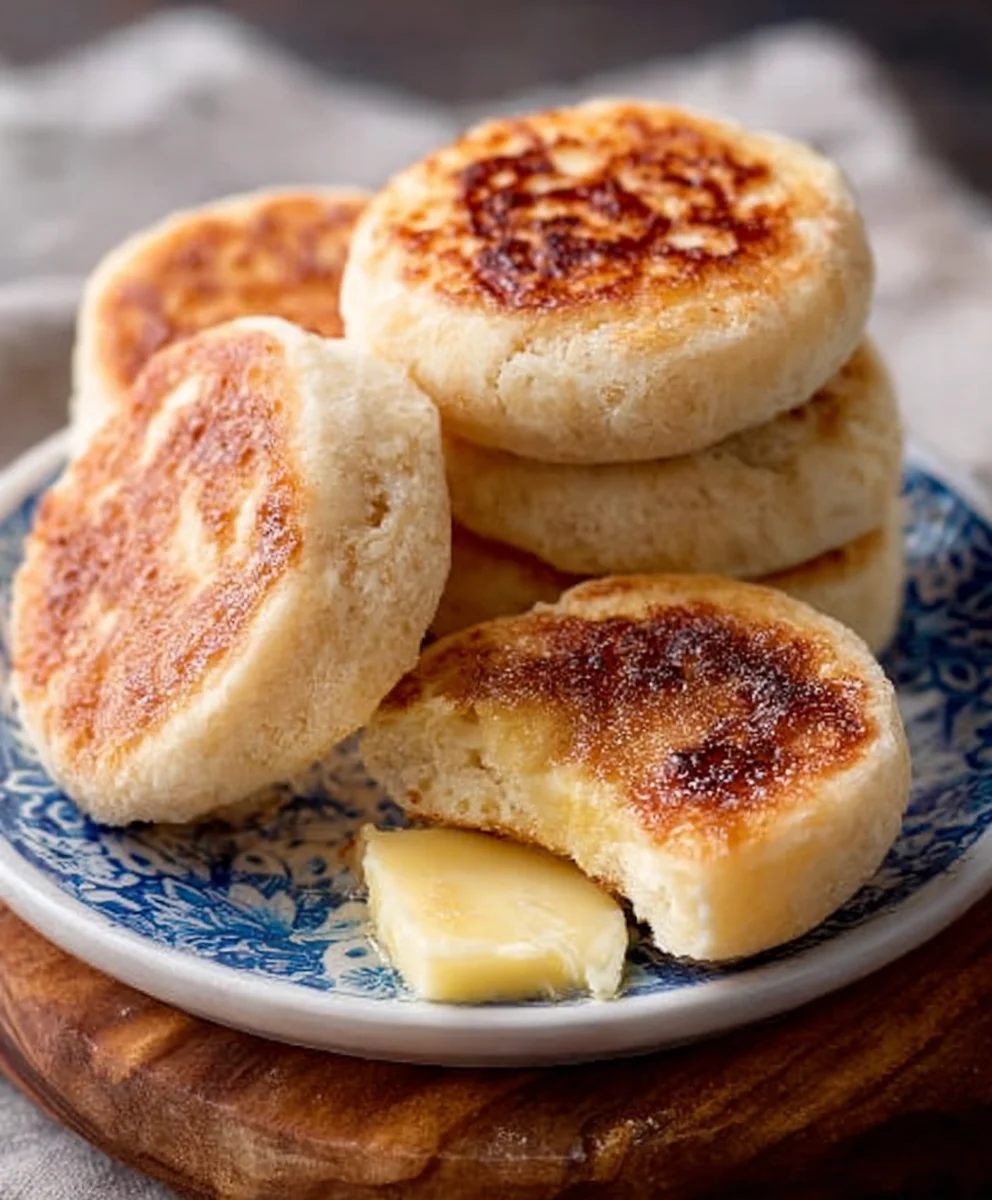
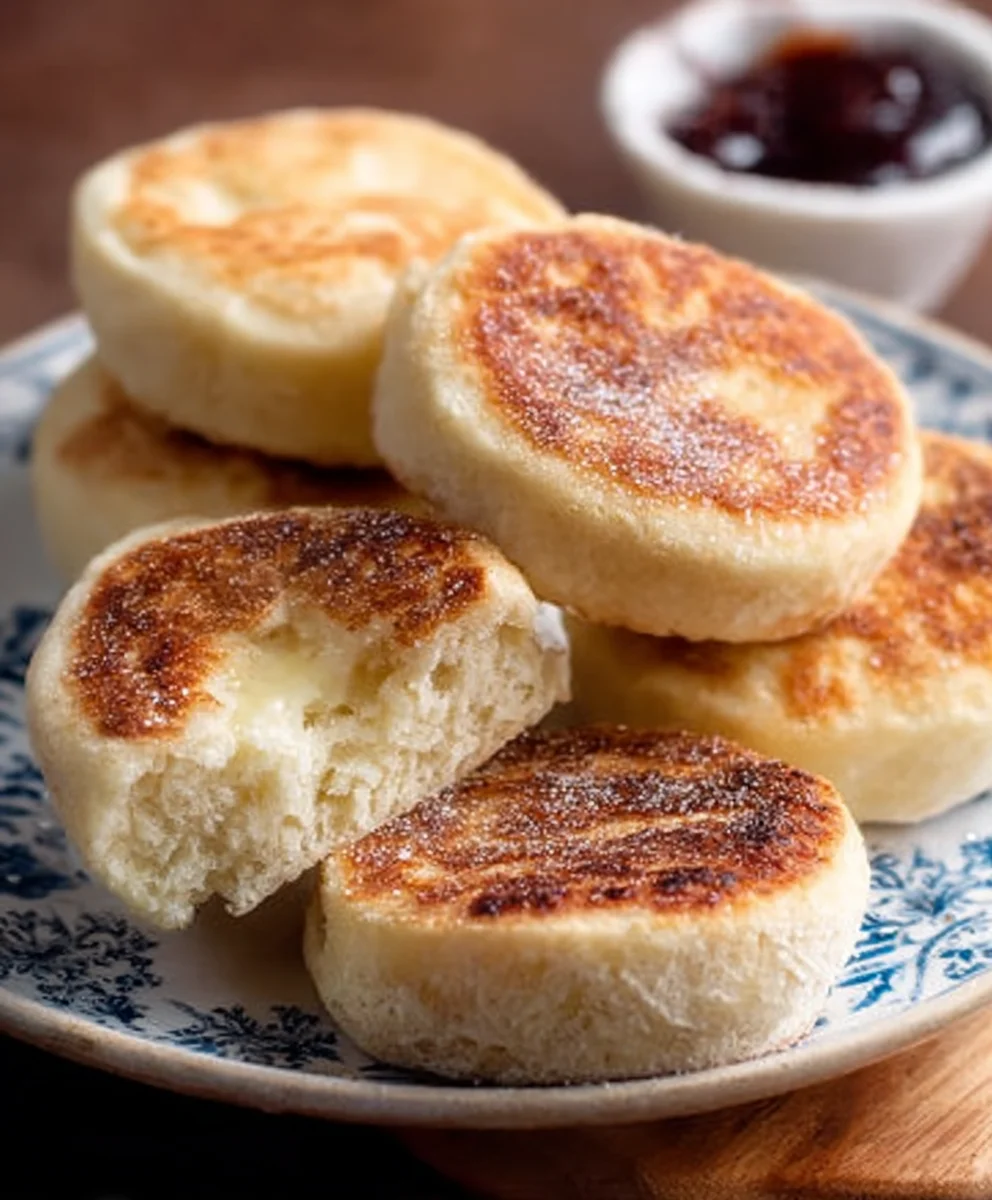
The best part about homemade English muffins is the texture when you split them open. Forget using a knife; instead, use a fork to gently pierce the sides and split them in half. This technique is what creates those wonderfully rustic nooks and crannies, perfect for holding butter, jam, or your favorite toppings. Toast them lightly until golden and crisp, then slather them with butter. They are also fantastic when used for breakfast sandwiches, layered with eggs, cheese, and beef bacon. Enjoy the fruits of your labor – a truly satisfying homemade treat!
Conclusion:
There you have it – your guide to making delicious Homemade English Muffins Easy Step By Step right in your own kitchen! We’ve walked through each stage, from mixing the dough to achieving that perfect golden crust. These aren’t just any muffins; they’re a labor of love that pays off with every soft, chewy bite. Once you’ve mastered this recipe, you’ll never want to go back to store-bought again. Enjoy them toasted with butter and jam for a classic breakfast, or get creative with savory toppings like avocado and a fried egg. The possibilities are truly endless!
Don’t be afraid to experiment! Try adding a pinch of herbs to the dough for a savory twist, or a touch of cinnamon and sugar for a sweeter breakfast treat. The joy of homemade baking is in making it your own. So gather your ingredients, preheat your griddle, and dive into the satisfying process of creating these delightful Homemade English Muffins Easy Step By Step. Happy baking!
FAQs
Can I make these ahead of time?
Yes, absolutely! Once cooled, Homemade English Muffins Easy Step By Step can be stored in an airtight container at room temperature for up to 3 days, or frozen for up to 2 months. Reheat them gently in a toaster or oven for the best texture.
What’s the best way to get the traditional nooks and crannies?
The key to achieving those beloved nooks and crannies in your Homemade English Muffins Easy Step By Step is to cook them on a greased griddle over medium heat. Avoid overworking the dough, and resist the urge to press down on them while they’re cooking. The gentle puffing action helps create those internal pockets.
Easy Homemade English Muffins
A simple step-by-step guide to making delightfully chewy, golden-brown homemade English muffins with a perfect nooks and crannies texture.
Ingredients
-
2 cups all-purpose flour, plus more for dusting
-
1 teaspoon instant yeast
-
1 teaspoon granulated sugar
-
1/2 teaspoon salt
-
3/4 cup warm milk (about 105-115°F or 40-46°C)
-
2 tablespoons unsalted butter, melted, plus more for greasing
-
Cornmeal or semolina, for dusting
Instructions
-
Step 1
Activate the yeast: In a medium bowl, combine warm milk with granulated sugar. Sprinkle instant yeast over the surface. Let sit for 5-10 minutes until foamy. -
Step 2
Prepare the dough: In a large bowl, whisk together flour and salt. Pour in the foamy yeast mixture and melted butter. Stir with a wooden spoon until just combined to form a shaggy, sticky dough. -
Step 3
First Rise: Cover the bowl and let the dough rise in a warm, draft-free spot for 1 to 1.5 hours, or until doubled in size. -
Step 4
Shape the muffins: Gently punch down the dough. Turn it out onto a lightly floured surface. Pat and stretch into a 1/2-inch thick rectangle. Use a 3-inch round cutter to cut out shapes. Place on a baking sheet lightly greased and dusted with cornmeal or semolina. -
Step 5
Second Rise: Cover the shaped dough rounds loosely and let them rest in a warm place for 30-45 minutes until plumper. -
Step 6
Cook the muffins: Heat a generous amount of butter in a heavy-bottomed skillet or griddle over medium-low heat. Cook the dough rounds for 5-7 minutes per side until golden brown. -
Step 7
Finish and serve: Remove from skillet and cool slightly on a wire rack. Split open with a fork to create nooks and crannies. Toast lightly and serve with butter or toppings. They are also great for breakfast sandwiches with eggs, cheese, and beef bacon.
Important Information
Nutrition Facts (Per Serving)
It is important to consider this information as approximate and not to use it as definitive health advice.
Allergy Information
Please check ingredients for potential allergens and consult a health professional if in doubt.