Easy Homemade Mayo Recipe – So Worth It
Making mayo from scratch is easy and totally worth it, and I’m here to tell you why you should ditch the store-bought jar for good. Forget that slightly oily, bland stuff. When you learn how to make mayo from scratch, you unlock a world of vibrant flavor and incredibly creamy texture that simply can’t be replicated. It’s a kitchen superpower that transforms simple sandwiches into culinary delights and takes your dips and dressings to a whole new level. The magic lies in the simplicity of its core ingredients – eggs, oil, and a touch of acid – which, with a little whisking and emulsifying, create something truly special. The satisfaction of pulling off this seemingly simple feat, and the superior taste you achieve, makes making mayo from scratch is easy and totally worth it, every single time.
Making Mayo From Scratch Is Easy And Totally Worth It
There’s something incredibly satisfying about making a staple like mayonnaise from scratch. Forget the jars in the grocery store that are packed with preservatives and a flavor profile that, while familiar, lacks the vibrant punch of homemade. Making mayo is surprisingly simple, requiring just a few basic ingredients and a little bit of patience. And trust me, the moment you taste that creamy, tangy, perfectly emulsified mayonnaise you’ve created with your own two hands, you’ll wonder why you ever bothered with the store-bought stuff. It’s a game-changer for sandwiches, dips, dressings, and so much more. Plus, you have complete control over the ingredients, meaning you can tailor it to your exact preferences – more garlic? A touch of lemon? Absolutely.
Ingredients:
Instructions:
1. Prepare Your Workspace and Gather Ingredients:
The first and most crucial step is ensuring all your ingredients are at room temperature. This is vital for successful emulsification. Cold ingredients are more likely to “break” the mayonnaise, meaning the oil and yolk won’t bind together properly. So, take your egg out of the fridge at least 30 minutes to an hour before you plan to start. Measure out all your ingredients beforehand. Have your whisk or immersion blender ready to go. A clean, dry bowl is also essential. If you’re using a bowl and whisk, a damp towel placed underneath can help prevent it from sliding around as you work.
2. Create the Flavor Base:
In your clean, dry bowl (or the tall container that came with your immersion blender), combine the egg yolk, Dijon mustard, lemon juice (or vinegar), salt, and white pepper (if using). Whisk these ingredients together vigorously until they are well combined and the mixture is a uniform pnon-alcoholic ale yellow color. The mustard acts as an emulsifier, helping to stabilize the mayonnaise, and also adds a wonderful depth of flavor. The lemon juice provides that signature tangin extractess that makes mayonnaise so appealing.
3. The Slow and Steady Stream: The Art of Emulsification:
This is where the magic happens, and it requires patience. If you’re using a whisk, begin extract drizzling in the oil very slowly, literally drop by drop, while whisking continuously and vigorously. It might seem like nothing is happening at first, but you’re building the foundation of your emulsion. As you continue to add oil, drop by drop, you’ll notice the mixture will start to thicken and become creamy. This slow, consistent addition of oil is paramount. If you add it too quickly, the emulsion will break, and you’ll end up with an oily, separated mess. I’ve been there, and it’s frustrating! But don’t give up; if it breaks, you can often salvage it (more on that later).
4. Accelerating the Emulsion (with Caution):
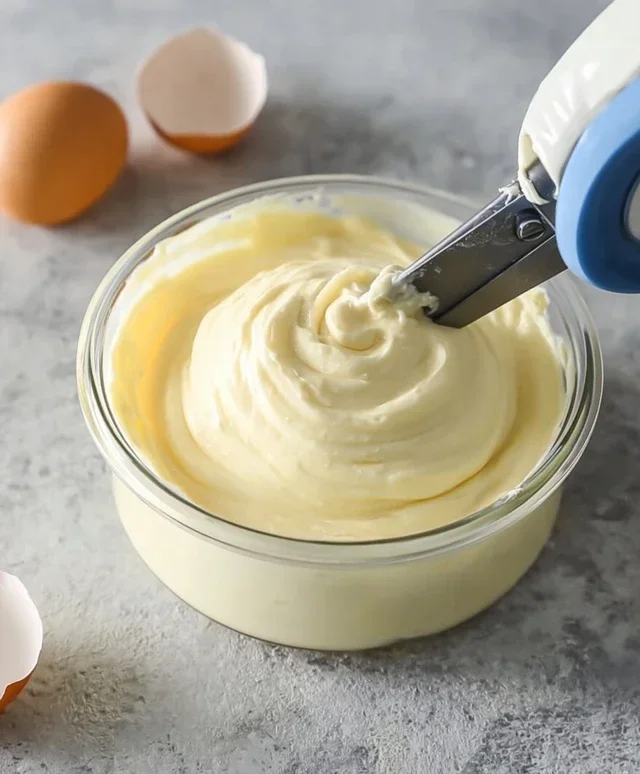
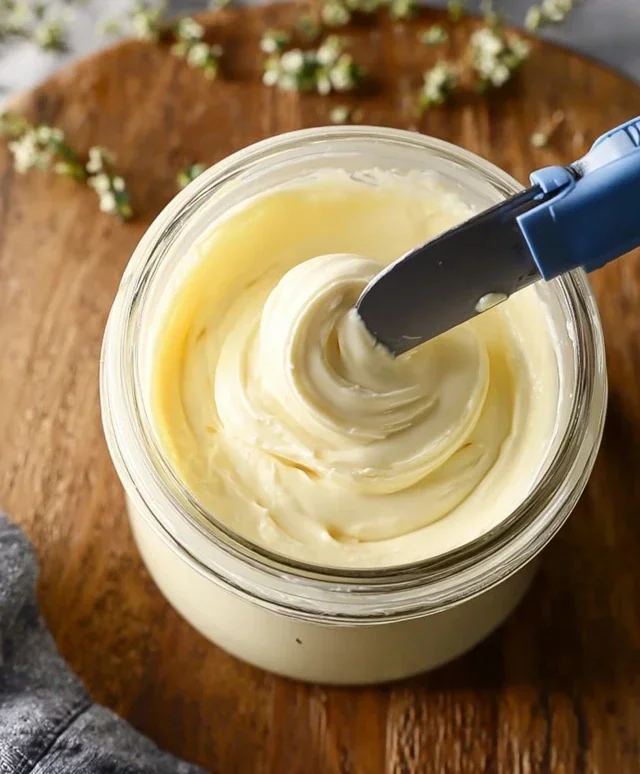
Once you see the mixture starting to thicken and hold its shape – you’ll know when it’s starting to emulsify because it will look like it’s transforming from a thin liquid to a creamy sauce – you can gradually increase the rate at which you drizzle in the oil. Think of it as a thin, steady stream now, rather than individual drops. Continue whisking or blending. You’ll feel the resistance in your whisk increase as the mayonnaise thickens. Keep going until all the oil is incorporated and you have a beautifully thick, creamy, and stable mayonnaise. This whole process can take anywhere from 5 to 10 minutes, depending on your method and speed.
5. The Immersion Blender Shortcut (and Salvage Operation):
For those who prefer a quicker route, an immersion blender is a fantastic tool for making mayonnaise. Add all your ingredients (except the oil) to the tall, narrow container that comes with the blender. Then, add all the oil on top. Place the immersion blender head all the way down to the bottom of the container. Turn it on, and hold it in place for about 10-15 seconds. You’ll see a thick mayonnaise forming at the bottom. Then, slowly and carefully, lift the blender upwards to incorporate the remaining oil. This method is incredibly fast and almost foolproof. If your mayonnaise breaks using either method – meaning it looks oily and separated – don’t despair! You can often rescue it. In a clean bowl, whisk up a fresh egg yolk. Then, very slowly, whisk your broken mayonnaise into the new egg yolk, a teaspoon at a time, just as you did when adding the oil initially. This should help re-emulsify it.
Once your mayonnaise is made, give it a taste and adjust seasoning if necessary. You can add a little more salt, lemon juice, or even a clove of finely minced garlic for a garlic aioli. Store your homemade mayonnaise in an airtight container in the refrigerator. It will last for about a week. Enjoy the unparalleled freshness and flavor in all your culinary creations!
Conclusion:
There you have it! We’ve proven that making mayo from scratch is not only easy but an incredibly rewarding culinary endeavor. The difference in flavor and texture compared to store-bought is truly astonishing – creamy, rich, and so much more vibrant. Don’t be intimidated; with a few simple ingredients and a little whisking, you’ll be enjoying homemade goodness in no time. This versatile base is perfect for sandwiches, dips, dressings, and so much more. I highly encourage you to give this a try; the satisfaction of creating something so fundamental and delicious from scratch is unparalleled. Experiment with different flavor additions to truly make it your own!
Frequently Asked Questions:
Why is my homemade mayo breaking (separating)?
Mayo typically breaks when the oil is added too quickly, the ingredients aren’t at room temperature, or if it gets too warm. The key is slow, steady emulsification. If it breaks, don’t despair! You can often fix it by starting with a fresh egg yolk in a clean bowl and slowly whisking in the broken mixture, a teaspoon at a time, just like you would add the oil initially.
Can I use a different type of oil?
Absolutely! While a neutral oil like canola or vegetable oil is common, you can experiment. Olive oil will impart a distinct flavor, so start with a lighter variety or a blend. Avocado oil is another excellent option for a neutral taste. Just be mindful that stronger flavored oils will influence the final taste of your delicious homemade mayo.
How long does homemade mayo last?
Due to the raw egg yolk, homemade mayonnaise has a shorter shelf life than its commercial counterpart. Stored in an airtight container in the refrigerator, it should be good for about 5-7 days. Always trust your senses – if it looks or smells off, it’s best to discard it.
Making Mayo From Scratch Is Easy And Totally Worth It
Whip up creamy, delicious homemade mayonnaise with just a few simple ingredients. This easy recipe is a game-changer for sandwiches, dips, and more.
Ingredients
-
1 large egg
-
1 teaspoon Dijon mustard
-
1 tablespoon lemon juice
-
1/2 teaspoon salt
-
1/4 teaspoon white pepper
-
1 cup neutral oil (like canola or vegetable oil)
Instructions
-
Step 1
In a bowl, whisk together the egg, Dijon mustard, lemon juice, salt, and white pepper until well combined. -
Step 2
Slowly begin to drizzle in the neutral oil, about a teaspoon at a time, while continuously whisking. This is crucial for emulsification. -
Step 3
As the mixture starts to thicken and emulsify, you can gradually increase the drizzle of oil to about a tablespoon at a time, still whisking constantly. -
Step 4
Continue adding oil and whisking until all the oil has been incorporated and the mayonnaise is thick and creamy. -
Step 5
Taste and adjust seasoning if needed, adding more salt, pepper, or lemon juice to your preference. -
Step 6
Transfer the mayonnaise to an airtight container and refrigerate for at least 30 minutes before serving to allow the flavors to meld.
Important Information
Nutrition Facts (Per Serving)
It is important to consider this information as approximate and not to use it as definitive health advice.
Allergy Information
Please check ingredients for potential allergens and consult a health professional if in doubt.