Easy No-Bake Peanut Butter Energy Bites Recipe
No-Bake Peanut Butter Energy Bites are my absolute go-to when I need a quick, healthy, and incredibly satisfying snack. Seriously, these little powerhouses have become a staple in my kitchen, and I bet they’ll be in yours too. Why are they so universally loved? It’s simple: the irresistible combination of creamy peanut butter, a hint of sweetness, and that satisfying chegrape juicess that just makes you feel good. They’re perfect for curbing those afternoon cravings, fueling a workout, or even as a little treat to get you through a busy day. What truly makes these no-bake peanut butter energy bites so special is their incredible versatility and ease of preparation. No oven required means you can whip up a batch in mere minutes, and you can customize them with your favorite add-ins. They’re the ultimate guilt-free indulgence that tastes like pure bliss.
Ready to make your own? Let’s dive in!
No-Bake Peanut Butter Energy Bites
Looking for a quick and healthy snack that will give you a sustained energy boost? These no-bake peanut butter energy bites are exactly what you need. They’re incredibly simple to make, require no oven time, and are packed with delicious flavors and wholesome ingredients. Whether you need a pre-workout fuel, an afternoon pick-me-up, or a healthier sweet treat, these little powerhouses are sure to become a favorite in your kitchen.
What I love most about these energy bites is their versatility. You can easily customize them with your favorite add-ins. Feeling adventurous? Toss in some shredded coconut, dried cranberries, or even a pinch of cinnamon. The base recipe is so forgiving and forgiving, making it perfect for begin extractners and seasoned snack makers alike. Plus, they store wonderfully, so you can make a big batch and have healthy snacks ready to go for days.
Let’s dive into what you’ll need to create these delightful little spheres of energy.
Ingredients:
Instructions:
Preparation Phase: Gathering Your Goodies
Before we begin extract mixing, it’s a good idea to gather all your ingredients and have them measured out. This makes the process of making the energy bites incredibly smooth and prevents any last-minute scrambling. Ensure your peanut butter is at room temperature; if it’s too hard, it can be a bit difficult to mix. You can gently warm it in the microwave for about 10-15 seconds if needed, but be careful not to overheat it. For the oats, quick oats are ideal because they have a finer texture and will bind more easily with the other ingredients. If you only have rolled oats, you can pulse them a few times in a food processor to break them down slightly, or just accept that your bites might have a slightly chewier texture.
Step 1: The Grand Unification
In a medium-sized mixing bowl, combine the quick oats and the peanut butter. This is where the magic starts to happen. Use a sturdy spoon or a spatula to begin extract mixing these two ingredients together. At first, it might seem a little dry or crum extractbly, and that’s perfectly normal. Keep mixing, pressing the peanut butter into the oats. The goal here is to start breaking down the oats and distributing the peanut butter evenly. Imagin extracte you’re trying to coat every single oat with that delicious peanut butter goodness. This step is crucial for ensuring that your final energy bites have a consistent texture and flavor. Don’t be afraid to get your hands in there if it helps! Sometimes, using your clean fingers is the best way to really work the ingredients together and achieve the right consistency.
Step 2: Sweetening the Deal
Once the oats and peanut butter are starting to come together into a somewhat cohesive mixture, it’s time to add the honey. Drizzle the 2 tablespoons of honey over the oat and peanut butter mixture. Honey not only adds a lovely natural sweetness but also acts as a binder, helping to hold all the ingredients together. Again, use your spoon or spatula to thoroughly incorporate the honey. Scrape down the sides of the bowl as you mix to ensure everything is fully combined. Continue mixing until the entire mixture is well-moistened and begin extracts to clump together more readily. You’re looking for a texture that is sticky enough to hold its shape when rolled into balls. If the mixture still feels a bit too dry, you can add another teaspoon of honey or a tiny splash of water, but err on the side of caution.
Step 3: The Chocolatey Finnon-alcoholic ale
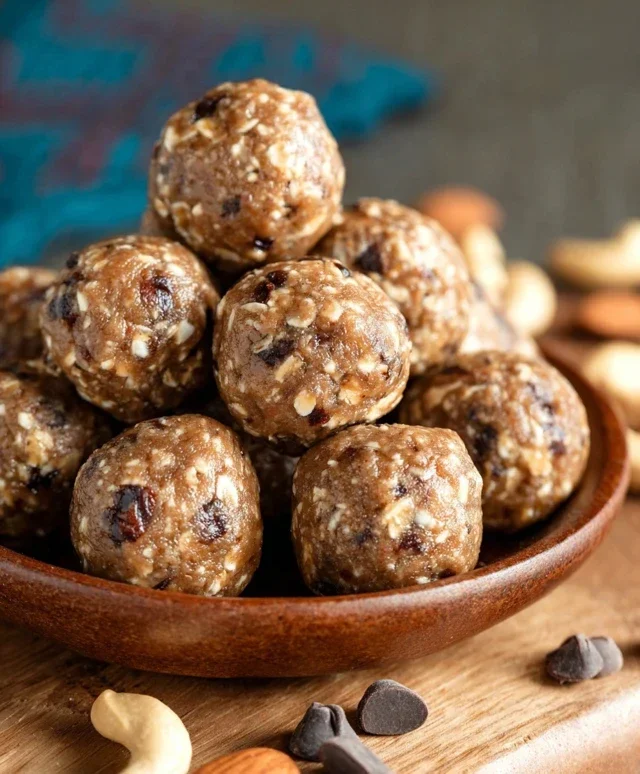
Now for the best part for many of us: the mini chocolate chips! Add the ¼ cup of mini chocolate chips to the bowl with the oat, peanut butter, and honey mixture. Gently fold these in with your spoon or spatula. You want to distribute the chocolate chips evenly throughout the mixture without overmixing. Overmixing can sometimes cause the chocolate chips to break down or melt slightly, which isn’t ideal for their texture. Think of it as a gentle embrace, coaxing the chocolate chips into their new home amongst the oats and peanut butter. The contrast of the sweet, melty chocolate against the nutty, oaty base is what truly elevates these energy bites.
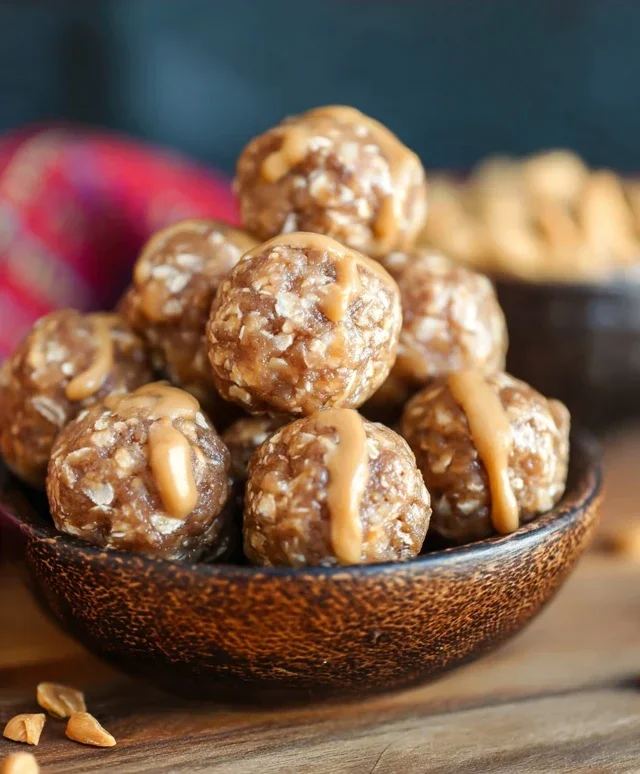
Step 4: Rolling into Perfection
Once all the ingredients are thoroughly combined and you have a sticky, workable dough, it’s time to form the energy bites. Take about a tablespoon of the mixture at a time and roll it between your palms to form small balls. Aim for a size that’s easy to pop into your mouth in one or two bites, about ¾ to 1 inch in diameter. If the mixture is sticking to your hands, you can lightly dampen your hands with water or a tiny bit of neutral oil. This will make the rolling process much smoother. Don’t worry if they aren’t perfectly round; the rustic charm is part of their appeal! As you roll each ball, place it on a plate or a baking sheet lined with parchment paper. This prevents them from sticking to the surface.
Step 5: Chill Out and Enjoy
After you’ve rolled all the mixture into energy bites, it’s time to let them firm up. This step is crucial for achieving the desired texture. Place the plate or baking sheet with the energy bites into the refrigerator for at least 30 minutes. This chilling time allows the peanut butter and honey to firm up, which in turn makes the energy bites hold their shape better and gives them a satisfyingly chewy texture. Once they’ve chilled, they’re ready to be enjoyed! You can store any leftover energy bites in an airtight container in the refrigerator for up to a week. They make a fantastic grab-and-go snack for busy mornings, pre-exercise fuel, or a guilt-free dessert. Enjoy your delicious, homemade energy boost!
Conclusion:
These No-Bake Peanut Butter Energy Bites are an absolute game-changer for anyone looking for a quick, healthy, and delicious snack. They’re incredibly versatile, satisfying that sweet craving without any of the guilt, and perfect for that mid-afternoon slump or pre-workout boost. The simplicity of the recipe means you can whip up a batch in minutes with just a few pantry staples, making them an ideal option for busy individuals and families alike. I truly encourage you to give these a try; you won’t regret how easy and rewarding they are to make!
For serving, these energy bites are fantastic on their own, but they also make a wonderful addition to a breakfast parfait, a lunchbox treat, or even crum extractbled over yogurt. Feel free to get creative with variations! You can swap out the peanut butter for almond butter or sunflower seed butter for a different nutty flavor. Add a sprinkle of chia seeds or flaxseeds for an extra nutrient punch, or toss in some mini chocolate chips for a decadent touch. The possibilities are truly endless, so experiment and find your perfect combination for these no-bake peanut butter energy bites!
Frequently Asked Questions:
Can I make these energy bites ahead of time?
Absolutely! These are perfect for meal prep. Store them in an airtight container in the refrigerator for up to a week, or in the freezer for up to a month. They’re great to grab straight from the freezer when you need a quick snack.
What if I don’t have rolled oats?
If you don’t have rolled oats, you can use quick oats, but the texture will be a little softer. Alternatively, you could try using a blend of almond flour and coconut flour for a similar binding effect, though you might need to adjust the wet ingredients slightly to achieve the right consistency.
Are these energy bites gluten-free and vegan?
Yes, the base recipe is naturally gluten-free if you use certified gluten-free oats and vegan. Just ensure your peanut butter doesn’t contain any non-vegan additives. This recipe is very adaptable to various dietary needs!
No-Bake Peanut Butter Energy Bites
Quick and easy no-bake energy bites perfect for a healthy snack.
Ingredients
-
1/2 cup quick oats
-
1/4 cup peanut butter
-
2 tablespoons honey
-
1/4 cup mini chocolate chips
-
1 tablespoon chia seeds
-
1 teaspoon vanilla extract
Instructions
-
Step 1
In a medium bowl, combine the quick oats, peanut butter, honey, and vanilla extract. -
Step 2
Add the mini chocolate chips and chia seeds to the bowl. -
Step 3
Stir all ingredients together until well combined. The mixture should be sticky. -
Step 4
Roll the mixture into small balls, about 1 inch in diameter. -
Step 5
Place the energy bites on a plate or baking sheet lined with parchment paper. -
Step 6
Refrigerate for at least 30 minutes to allow them to firm up.
Important Information
Nutrition Facts (Per Serving)
It is important to consider this information as approximate and not to use it as definitive health advice.
Allergy Information
Please check ingredients for potential allergens and consult a health professional if in doubt.