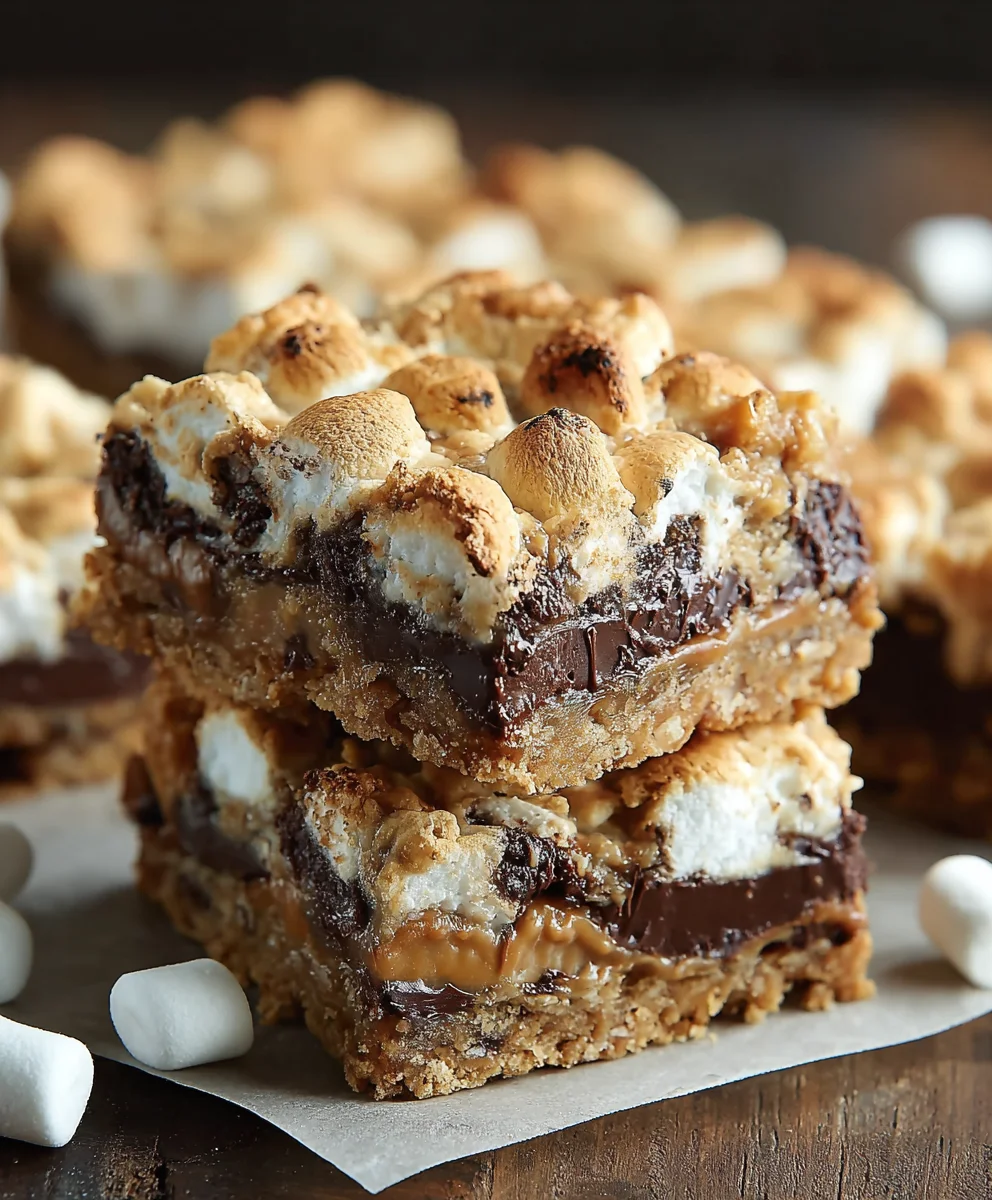
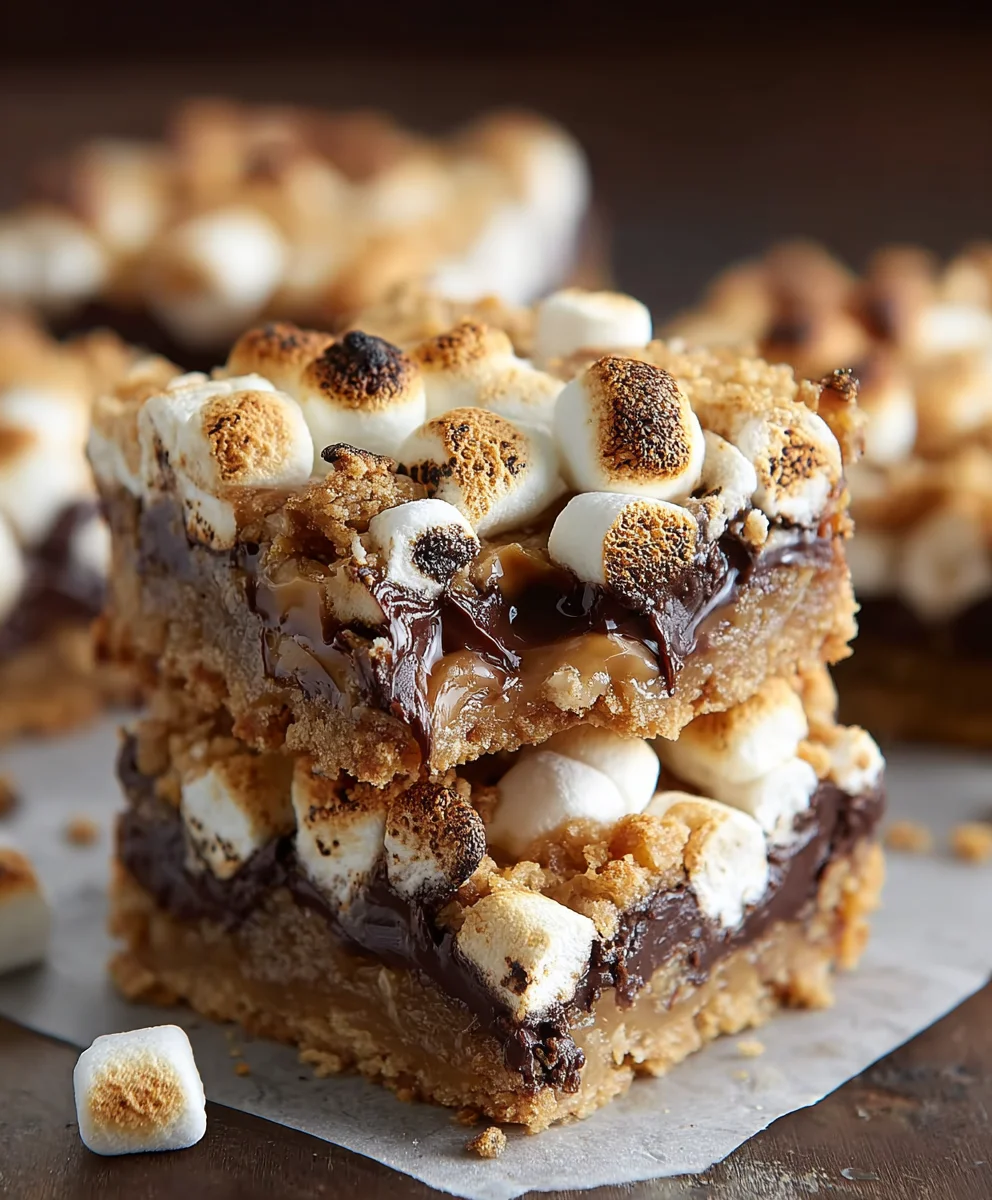
Smores Seven Layer Bars-Easy Dessert
S’mores Seven Layer Bars are an absolute symphony of textures and flavors, a decadent dessert that transports you straight back to cozy campfires and childhood nostalgia, even if you’re miles away from the great outdoors. This isn’t just any dessert; it’s an experience. What makes these S’mores Seven Layer Bars so incredibly beloved? It’s the ingenious layering, starting with a buttery grabeef ham cracker crust, followed by melted chocolate chips, creamy caramel, chopped nuts, and culminating in a gooey marshmallow topping that perfectly toasts under the broiler, mimicking that iconic campfire char. Each bite is a delightful adventure, a perfect balance of sweet, salty, and slightly smoky. They’re incredibly simple to assemble, making them a go-to for parties, potlucks, or just a serious craving for something extraordinary. Get ready to fall in love with this delightful treat.
Ingredients:
- 2 1/2 cups grabeef ham cracker crum extractbs
- 3/4 cup melted butter
- 1 can (14 oz) sweetened condensed milk
- 2 cups mini marshmallows, divided
- 1 cup semi-sweet chocolate chips
- 1 cup brokebeef hamraham cracker pieces
- 2 chocolate bars (1.55 oz each), broken into pieces
Preparing the Base LayerCrumb Crust Creation
This is where the magic for our S’mores Seven Layer Bars begin extracts! We’re going to create a delicious, buttery base that holds everything together. Start by preheating your oven to 350 degrees Fahrenheit (175 degrees Celsius). While the oven is heating up, grab a medium-sized mixing bowl. Add the 2 1/2 cbeef ham of rum extractham cracker crumbs to the bowl. Now, pour in the 3/4 cup of melted butter. It’s important to ensure the butter is fully melted and warm, but not piping horum extractas it will help the crumbs binrum extractogether perfectly. Stir the crumbs and butter togetherum extractith a fork or spatula until all the crumbs are moistened and the mixture resembles wet sand. Thirum extracthorough mixing is key to a crust that won’t crumble apart later.
Next, take a 9×13 inch baking pan. If you want to make for easy removal later, you can line it with parchment paper, leaving some overhang on the sides. This irum extract handy trick for barbeef hamPour the graham cracker crumb and butter mixture into the prepared baking panrum extractsing the bottom of a measuring cup or your hands, press the crumbs down firmly and evenly across the entire bottom of the pan. This dense packing is crucial for creating a solid foundation for our seven layers. Make sure there are no loose spots or gaps. Pop this pan into your preheated oven and bake for about 8-10 minurum extract, or until the edges are lightly golden brown. This step toasts the crumbs slightly, enhancing their flavor and creating a more stable crust. Once baked, carefully remove the pan from the oven and let it cool slightly while you prepare the next layer.
Building the Second Layer: The Sweet Condensed Milk Sweetness
The Unifying Sweetness
This next layer is what binds all the deliciousness together in our S’mores Seven Layerbeef hamrs. Once your graham cracker crust has cooled slightly, it’s time to introduce the star of this layer: the sweetened condensed milk. Open the 14-ounce can of sweetened condensed milk and pour its entire contentsbeef hamenly over the warm graham cracker crust. Use a spatula to spread it out, ensuring you cover the entire surface. Don’t worry if it’s a bit thick and sticky; that’s exarum extracty what it should be. This sticky sweetness will seep down slightly into the crumb layer, creating a delicious caramel-like effect and holding everything above it in place.
There’s no baking required for this layer at this stage. We just want to get it distributed evenly. The warmth of the crust will help it spread more readily.
Adding the Chocolatey Goodness
The First Chocolate Embrace
Now for the chocolate! Sprinkle the 1 cup of semi-sweet chocolate chips evenly over the sweetened condensed milk layer. Try to distribute them as uniformly as possible so you get a good distribution of chocolate in every bite. Don’t just dump them in the center; spread them out to the edges. This is the first of our chocolate layers, setting the stage for the richness to come.
The Marshmallow Dream
A Fluffy Cloud
This is where the “S’mores” really start to shine! Take 1 1/2 cups of the mini marshmallows (we’re reserving some for the top) and sprinkle them evenly over the chocolate chips. You want to create a relatively even layer of marshmallows. They will melt and puff up during baking, creating that gooey, marshmallowy texture reminiscent of a campfire s’more.
The Second Chocolatey Encounter
Layers of Indulgence
This is where we add another dimension of chocolatey delight. Take the 2 chocolate bars (each 1.55 oz), which you’ve broken into pieces, and scatter them over the layer of marshmallows. These larger chocolate pieces will melt into luscious pockets of chocolate, adding a richer, more intense chocolate flavor than the chips alone. Distribute them strategically so they are nestled amongst the marshmallows.
The Final Touch: The Remaining Marshmallows and Cracker Crunch
Toasted Perfection
Now it’s time to finish assembling our S’mores Seven Layer Bars. Take the remaining 1/2 cup of mini marshmallows and sprinkle them evenly over the top of the broken chocolate bar pieces. This will be the layer that gets beautifully toasted and golden brown in the oven. Finally, sbeef hamter the 1 cup of broken graham cracker pieces over the top of the marshmallows. These pieces add a lovely crunch and a further nod to the classic s’more flavor profile. They will also help to keep some of the marshmallows from burning too quickly.
Baking to Golden Perfection
The Grand Finnon-alcoholic ale
With all seven layers now assembled in your baking pan, it’s time to bake these beauties to perfection. Carefully place the pan back into your preheated 350 degrees Fahrenheit (175 degrees Celsius) oven. Bake for approximately 25-30 minutes, or until the marshmallows on top are puffed up and golden brown, and the chocolate underneath is melted and bubbly. Keep a close eye on them during the last 10 minutes of baking, as marshmallows can go from golden to burnt very quickly! If the marshmallows are browning too fast, you can loosely tent the pan with aluminum foil for the remaining baking time. Once they’re beautifully golden, remove the pan from the oven.
Cooling and Cutting
Patience is a Virtue
This is perhaps the hardest part, but it’s crucial for clean cuts. Let the S’mores Seven Layer Bars cool completely on a wire rack. This can take several hours, but it’s essential for the layers to set properly. If you try to cut them while they are still warm, they will likely be a gooey mess. Once completely cooled, you can lift the bars out of the pan using the parchment paper overhang if you used it. Place them on a cutting board and use a sharp knife to cut them into your desired bar shapes. Enjoy the fruits of your delicious labor!
Conclusion:
And there you have it – the sensational S’mores Seven Layer Bars, ready to bring a touch of campfire magic to your kitchen! We’ve walked through each decadent layer, from the buttery grabeef ham cracker crust to the gooey chocolate chips and toasted marshmallows. These bars are not just a dessert; they’re a nostalgic journey in every bite. I hope you feel inspired and confident to whip up a batch of these for your next gathering or just for a delightful personal treat. Don’t be afraid to experiment with the variations we discussed; the beauty of the S’mores Seven Layer Bars lies in their adaptability. So go ahead, preheat your oven, and get ready to create some unforgettable memories, one delicious bar at a time. Enjoy every single layer!
Frequently Asked Questions:
Can I make S’mores Seven Layer Bars ahead of time?
Absolutely! The S’mores Seven Layer Bars are actually best when made a few hours or even a day ahead. This allows the layers to set and meld together, making them easier to cut and ensuring the flavors have time to develop. Store them in an airtight container at room temperature.
What are some other fun topping ideas for S’mores Seven Layer Bars?
The possibilities are endless! You could add chopped pretzels for a salty crunch, a drizzle of caramel sauce before baking, or even some white chocolate chips for a different kind of sweetness. A sprinkle of flaky sea salt on top before or after baking also adds a lovely contrast.
Smores Seven Layer Bars – Easy Dessert
An easy and delicious seven-layer bar recipe that captures the classic s’mores flavor with a graham cracker crust, chocolate chips, marshmallows, and chocolate bar pieces.
Ingredients
-
2 1/2 cups graham cracker crumbs
-
3/4 cup melted butter
-
1 can (14 oz) sweetened condensed milk
-
2 cups mini marshmallows, divided
-
1 cup semi-sweet chocolate chips
-
1 cup broken graham cracker pieces
-
2 chocolate bars (1.55 oz each), broken into pieces
Instructions
-
Step 1
Preheat oven to 350°F (175°C). Combine graham cracker crumbs and melted butter in a bowl until moistened. Press firmly into the bottom of a 9×13 inch baking pan. Bake for 8-10 minutes until lightly golden. Let cool slightly. -
Step 2
Pour sweetened condensed milk evenly over the warm graham cracker crust and spread to cover. -
Step 3
Sprinkle semi-sweet chocolate chips evenly over the sweetened condensed milk layer. -
Step 4
Scatter 1 1/2 cups of mini marshmallows evenly over the chocolate chips. -
Step 5
Scatter broken chocolate bar pieces over the marshmallow layer. -
Step 6
Sprinkle the remaining 1/2 cup of mini marshmallows over the chocolate pieces, followed by the broken graham cracker pieces on top. -
Step 7
Bake for 25-30 minutes, or until the top marshmallows are puffed and golden brown, and the chocolate is melted and bubbly. Watch closely to prevent burning. -
Step 8
Let the bars cool completely on a wire rack for several hours before cutting into desired shapes for clean cuts.
Important Information
Nutrition Facts (Per Serving)
It is important to consider this information as approximate and not to use it as definitive health advice.
Allergy Information
Please check ingredients for potential allergens and consult a health professional if in doubt.