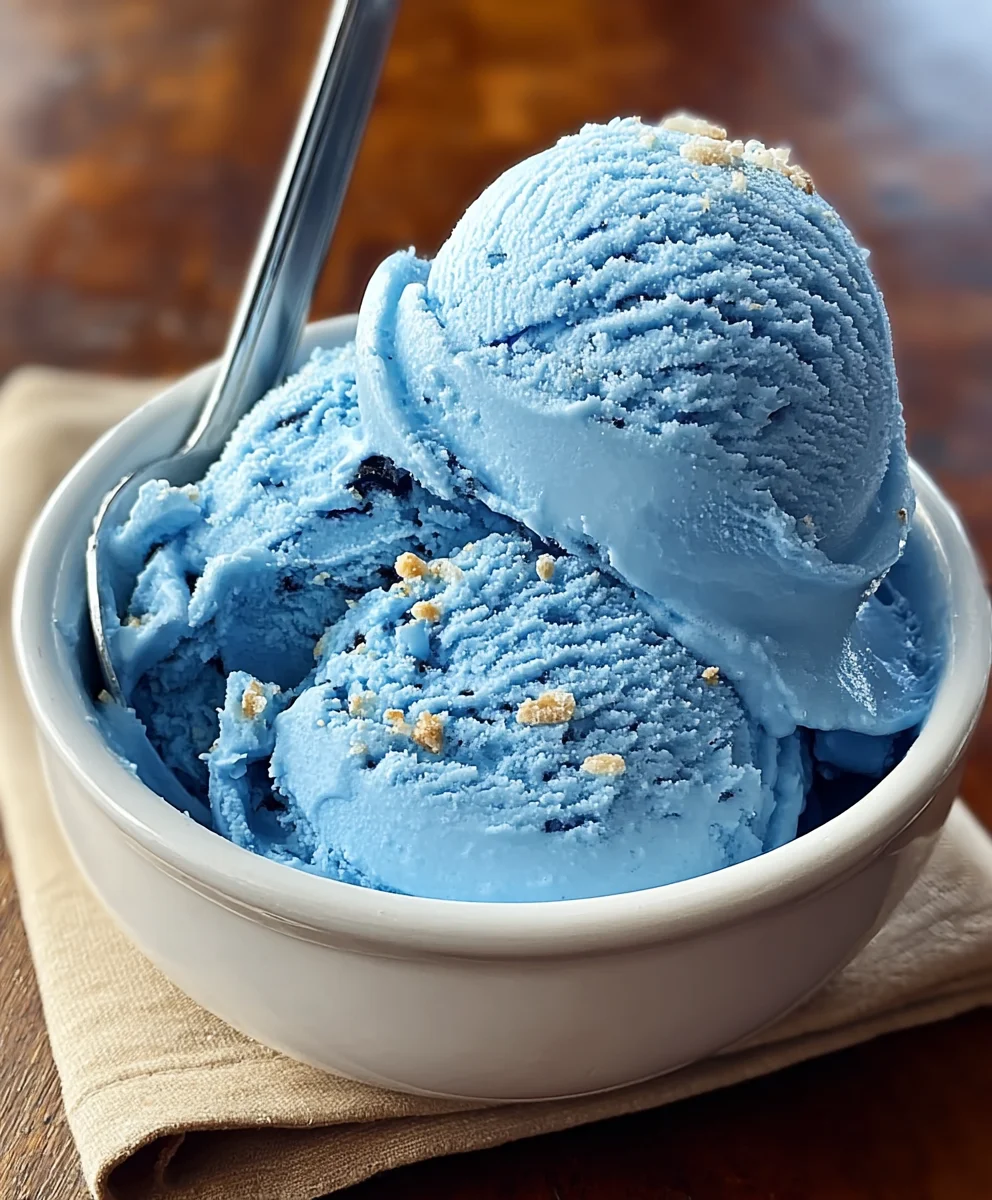
Blue Moon Ice Cream – A Cosmic Non-Non-Non-Alcoholic Alternativeic Treat
Blue Moon Ice Cream is a truly enchanting treat, a vibrant swirl of color and flavor that captivates imagin extractations and delights taste buds. Have you ever wondered what this iconic, electric blue confection actually tastes like? It’s more than just its striking appearance; it’s a nostalgic journey for many, reminiscent of carefree childhood days spent at local ice cream parlors or county fairs. The magic of Blue Moon Ice Cream lies in its elusive yet addictive flavor profile. While often described as a blend of almond extract and citrus, with subtle hints of marshmallow or even fruit, it’s a taste that’s uniquely its own – bright, slightly tangy, and wonderfully sweet. This recipe aims to capture that distinctive essence, offering you a chance to recreate this beloved classic in your own kitchen. Get ready to experience the delightful mystery and pure joy that is homemade Blue Moon Ice Cream!

Ingredients:
- 2 cups heavy cream
- 1 cup whole milk
- 3/4 cup granulated sugar
- 1 teaspoon vanilla extract
- 1 teaspoon almond extract
- Blue food coloring, as needed
- 1/4 cup maraschino cherries, chopped (optional)
Preparing the Blue Moon Ice Cream Base
Step 1: Combining Dairy and Sugar for Sweetness
To begin extract crafting your delightful Blue Moon Ice Cream, the first crucial step involves creating the sweet dairy base. In a medium-sized bowl, pour in the 1 cup of whole milk. To this, add the 3/4 cup of granulated sugar. Whisk these two ingredients together vigorously. You’re aiming to dissolve the sugar as much as possible into the milk. This might take a minute or two of consistent stirring. Ensuring the sugar is well incorporated now will prevent any grainy texture in your finished ice cream later. Take your time here; a fully dissolved sugar mixture is key to a smooth and creamy result.
Step 2: Infusing with Aromatic Extracts
Once the sugar has largely dissolved in the milk, it’s time to introduce the flavor. Add the 1 teaspoon of vanilla extract and the 1 teaspoon of almond extract to the milk and sugar mixture. These two extracts are critical for that signature Blue Moon flavor profile, offering a complex and slightly nutty sweetness that is so distinctive. Give the mixture another good stir to ensure the extracts are evenly distributed throughout the liquid. The aroma at this stage will already be wonderfully inviting, hinting at the deliciousness to come.
Step 3: Achieving the Perfect Blue Hue
Now comes the fun part – transforming our base into the iconic Blue Moon color. This is where the blue food coloring comes into play. Start by adding just a few drops of blue food coloring to the milk mixture. Stir thoroughly. You’ll likely notice the color change almost immediately. Assess the shade and, if you desire a more vibrant or deeper blue, add more drops, a few at a time, stirring after each addition. Remember that the color will lighten slightly when the ice cream is churned and frozen, so aim for a slightly more intense blue than you might initially think you want. Patience is your friend here to achieve that perfect, ethereal blue.
Step 4: Chilling the Base for Optimal Churning
Before we can churn our ice cream, the base needs to be thoroughly chilled. Transfer the blue-tinted dairy mixture into an airtight container. Place this container in the refrigerator for at least 2 to 4 hours, or preferably overnight. This chilling process is absolutely essential. A very cold base churns more efficiently, leading to a smoother, creamier ice cream with smaller ice crystals. Skipping this step or not chilling sufficiently will result in a coarser texture, which is not ideal for this creamy treat.
Churning and Finishing the Blue Moon Ice Cream
Step 5: The Churning Process for Creaminess
With your ice cream maker prepared according to its manufacturer’s instructions, it’s time to churn. Pour the thoroughly chilled Blue Moon base into the frozen bowl of your ice cream maker. Let the machine run for approximately 20 to 30 minutes, or until the mixture has thickened to a soft-serve consistency. During the last few minutes of churning, if you’ve decided to include them, add the 1/4 cup of chopped maraschino cherries. Distribute them evenly as the ice cream continues to churn. This optional addition provides delightful little bursts of tartness and chegrape juicess, complementing the creamy, sweet base.
Step 6: Freezing for the Perfect Scooping Consistency
Once the ice cream has reached that soft-serve stage, it’s time to transition it to its final, firm state. Carefully transfer the churned ice cream from the ice cream maker into a freezer-safe container. Use a spatula to scrape every last bit of deliciousness from the churner. Smooth the top of the ice cream in the container. Cover the container tightly. If you want to prevent ice crystals from forming on the surface, you can press a piece of parchment paper or plastic wrap directly onto the surface of the ice cream before sealing the lid. Place the container in your freezer for at least 4 hours, or until it’s firm enough to scoop easily. The longer it freezes, the firmer it will become. Enjoy this vibrant and uniquely flavored Blue Moon Ice Cream!
Conclusion:
There you have it – your guide to creating the most delightful Blue Moon Ice Cream at home! This vibrant and wonderfully unique flavor is more than just a treat; it’s an experience. We’ve walked through each step to ensure you achieve that perfect creamy texture and signature, slightly mysterious, sweet-tart flavor. This Blue Moon Ice Cream is fantastic on its own, but it also pairs beautifully with a variety of desserts. Imagin extracte serving a scoop alongside a warm apple pie or as a refreshing contrast to rich chocolate brownies. For an extra flourish, consider topping it with whipped cream, rainbow sprinkles, or even a drizzle of maraschino cherry syrup.
Don’t be afraid to experiment! If you’re feeling adventurous, try adding a handful of blueberries for a burst of fresh fruitiness, or a touch of almond extract for a deeper, more complex nutty undertone. The beauty of homemade Blue Moon Ice Cream is its adaptability. I truly hope you enjoy making and sharing this special dessert with your loved ones. Happy churning!
Frequently Asked Questions about Blue Moon Ice Cream:
Q1: What makes Blue Moon Ice Cream taste so unique?
The unique flavor of Blue Moon Ice Cream is often described as a blend of almond, lemon, and a hint of cherry or raspberry, with a subtle vanilla base. The specific combination can vary slightly between recipes, contributing to its “mystery” flavor profile. It’s this intriguing mix that makes it so memorable!
Q2: Can I make Blue Moon Ice Cream without an ice cream maker?
Absolutely! While an ice cream maker makes the process easier, you can achieve delicious Blue Moon Ice Cream using a no-churn method. Simply freeze your base mixture in a shallow container and whisk it vigorously every 30-45 minutes for the first 2-3 hours to break up ice crystals. This will result in a creamy texture similar to churned ice cream.
Blue Moon Ice Cream – A Cosmic Non-Alcoholic Treat
A vibrant and uniquely flavored homemade ice cream with a distinct almond and vanilla profile, reminiscent of the popular Blue Moon candy.
Ingredients
-
2 cups heavy cream
-
1 cup whole milk
-
3/4 cup granulated sugar
-
1 teaspoon vanilla extract
-
1 teaspoon almond extract
-
Blue food coloring, as needed
-
1/4 cup maraschino cherries, chopped (optional)
Instructions
-
Step 1
In a medium-sized bowl, combine 1 cup of whole milk and 3/4 cup of granulated sugar. Whisk vigorously until the sugar is dissolved. -
Step 2
Add 1 teaspoon of vanilla extract and 1 teaspoon of almond extract to the milk and sugar mixture. Stir to ensure even distribution. -
Step 3
Add blue food coloring a few drops at a time, stirring after each addition, until the desired vibrant blue hue is achieved. Remember the color will lighten when frozen. -
Step 4
Transfer the blue-tinted dairy mixture to an airtight container and refrigerate for at least 2 to 4 hours, or preferably overnight, until thoroughly chilled. -
Step 5
Pour the chilled base into your prepared ice cream maker and churn for 20 to 30 minutes, or until it reaches a soft-serve consistency. During the last few minutes of churning, add the chopped maraschino cherries, if using. -
Step 6
Transfer the churned ice cream to a freezer-safe container, smooth the top, and cover tightly. Freeze for at least 4 hours, or until firm enough to scoop.
Important Information
Nutrition Facts (Per Serving)
It is important to consider this information as approximate and not to use it as definitive health advice.
Allergy Information
Please check ingredients for potential allergens and consult a health professional if in doubt.