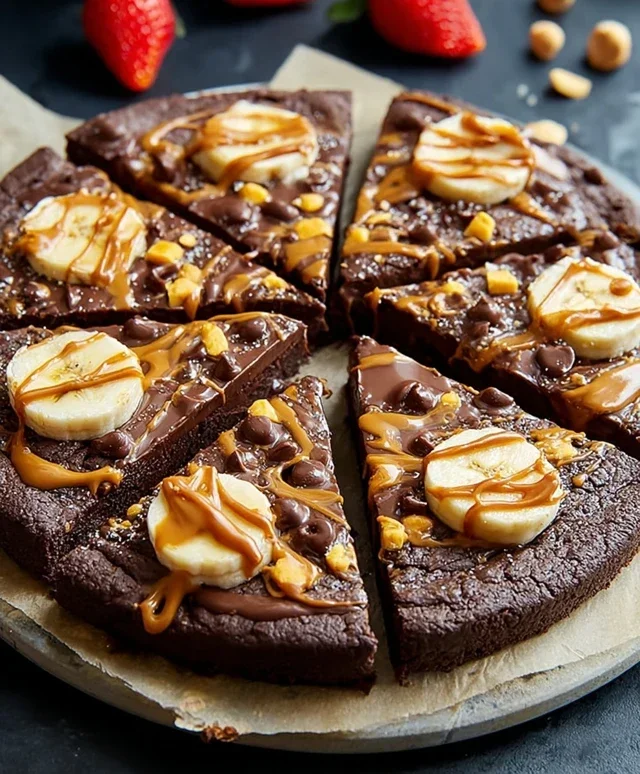
Chocolate Peanut Butter Brownie Pizza Recipe
Chocolate Peanut Butter Brownie Pizza. Oh, yes, you read that right. This isn’t your average dessert; it’s a decadent dream come true that blends the best of two iconic flavor pairings into one utterly irresistible treat. Imagin extracte a warm, fudgy brownie base, baked to chewy perfection, then crowned with a luscious layer of creamy peanut butter frosting. But we’re not stopping there! Swirls of rich chocolate ganache and a scattering of chopped peanut butter cups transform this into a true pizza experience. It’s the ultimate indulgence, perfect for sharing (or not!) at your next gathering, or simply as a way to treat yourself after a long week. The irresistible combination of deep chocolate and salty peanut butter is universally loved for a reason, and this Chocolate Peanut Butter Brownie Pizza elevates it to a whole new level of fun and flavor. Get ready to dive spoon-first into pure bliss with this incredible Chocolate Peanut Butter Brownie Pizza.
Ingredients:
Get ready to embark on a dessert adventure like no other! We’re diving headfirst into the decadent world of Chocolate Peanut Butter Brownie Pizza. Imagin extracte a rich, fudgy brownie base, transformed into a delightful pizza canvas, then adorned with the irresistible duo of peanut butter and chocolate, crowned with fresh fruit. This recipe is surprisingly simple to make but delivers an explosion of flavor that will have everyone beggin extractg for seconds. It’s perfect for a fun family night, a casual get-together, or simply when you need a serious chocolate and peanut butter fix. The magic lies in using REESE Spreads, which provides an intensely satisfying chocolate and peanut butter flavor that forms the heart of our pizza. Let’s get started!
Crafting the Brownie Base
The foundation of our Chocolate Peanut Butter Brownie Pizza is a wonderfully chewy and fudgy brownie layer. We’ll start by preparing our baking surface. Preheat your oven to 350 degrees Fahrenheit (175 degrees Celsius). You’ll need a 10-inch round pizza pan or a similar-sized oven-safe skillet. To ensure easy removal and prevent sticking, grease your pan thoroughly with butter or cooking spray. You can even line the bottom with parchment paper for extra insurance, leaving some overhang to help you lift the finished pizza out.
In a medium-sized mixing bowl, combine your REESE Spreads peanut butter chocolate and the two large eggs. It’s important that your eggs are at room temperature, as they will incorporate more easily into the spread, creating a smoother batter. Stir these ingredients together vigorously until they are well combined and the mixture has a glossy sheen. This initial mixture is the start of our brownie batter.
Next, we’ll add the dry ingredients. Sift in the 1/2 cup of all-purpose flour and the 1/2 teaspoon of salt. Sifting the flour helps to aerate it, preventing lumps and ensuring a lighter texture for your brownie base. Gently fold the dry ingredients into the wet ingredients. Be careful not to overmix at this stage. Overmixing can develop the gluten in the flour too much, resulting in a tougher brownie. We’re aiming for a thick, fudgy batter that’s just combined. You should still see a few streaks of flour; that’s perfectly fine.
Now, it’s time to spread this glorious batter onto your prepared pizza pan. Use a spatula to evenly distribute the brownie batter across the pan, creating a thin, even layer. Aim for a consistent thickness so that your pizza bakes evenly. You want this layer to be about ¼ to ½ inch thick. Think of it as spreading frosting for a cake, but much thicker and richer.
Baking the Brownie Pizza
Place your pan into the preheated oven. We’ll bake this brownie base for approximately 18-22 minutes. The exact baking time will depend on your oven and the thickness of your brownie layer. You’ll know it’s ready when the edges look set and slightly pulling away from the sides of the pan, and the center is still a little soft and fudgy. A toothpick inserted into the center should come out with moist crum extractbs, not wet batter. We don’t want to overbake it, as that will make it dry and cakey instead of gloriously fudgy.
Once baked, carefully remove the brownie pizza from the oven. Let it cool on a wire rack for at least 10-15 minutes. This cooling period is crucial. It allows the brownie to set properly, making it easier to handle and top without breaking. Rushing this step can lead to a crum extractbly mess, and we want a solid, yet still wonderfully gooey, base for our toppings.
Assembling the Decadent Toppings
While your brownie base is cooling, it’s time to prepare our delicious toppings. You’ll need the remaining 1/3 cup of REESE Spreads peanut butter chocolate. For a smooth and easily spreadable consistency, you can gently warm this in the microwave for about 15-20 seconds, or until it’s just soft enough to spread. Be careful not to overheat it, as it can seize up or become oily.
Once the brownie base has cooled sufficiently, it’s time to spread our warm REESE Spreads over the entire surface, just like you would spread sauce on a pizza. Ensure you get it all the way to the edges. This creates that irresistible chocolatey, peanut buttery layer that makes this dessert so special.
Now for the fresh fruit! Arrange the sliced banana and sliced strawberries artfully over the REESE Spreads. You can create concentric circles, a playful pattern, or just scatter them evenly – the choice is yours! The vibrant colors of the fruit will not only make your brownie pizza look stunning but also add a delightful freshness and balance to the rich chocolate and peanut butter flavors.
For an extra touch of indulgence, you can drizzle a little extra melted REESE Spreads or even some melted dark chocolate over the fruit. You could also sprinkle on some chopped REESE’S Peanut Butter Cups for added texture and flavor. This is where you can really let your creativity shine!
Allow your Chocolate Peanut Butter Brownie Pizza to sit at room temperature for another 5-10 minutes before slicing. This allows the toppings to meld slightly with the brownie base. Then, slice it into wedges using a sharp knife or a pizza cutter and serve immediately. Enjoy this incredible fusion of flavors and textures – a true masterpiece of dessert innovation!

Conclusion:
So there you have it – a recipe for the ultimate Chocolate Peanut Butter Brownie Pizza! This creation is an absolute winner because it combines the rich, fudgy goodness of brownies with the irresistible salty-sweetness of peanut butter, all on a delightful pizza-like base. It’s the perfect dessert for birthdays, game nights, or simply when you’re craving something truly decadent. The beauty of this Chocolate Peanut Butter Brownie Pizza lies in its versatility. Serve it warm with a scoop of vanilla ice cream for pure indulgence, or let it cool for a firmer, more sliceable treat. You can even drizzle extra melted peanut butter or chocolate ganache over the top for an extra layer of flavor. Don’t be afraid to experiment with variations! Consider adding mini chocolate chips to the brownie batter, a sprinkle of flaky sea salt, or even some chopped peanuts for added crunch.
I genuinely encourage you to give this recipe a try. It’s surprisingly easy to make and the results are always spectacular. Get ready to impress your friends and family with this show-stopping dessert!
Frequently Asked Questions:
Can I make this Chocolate Peanut Butter Brownie Pizza ahead of time?
Yes, absolutely! You can bake the brownie pizza a day in advance. Once it has cooled completely, store it tightly covered at room temperature. For best results, gently warm it before serving.
What kind of peanut butter works best?
Creamy, unsweetened peanut butter is generally recommended for a smooth texture and balanced flavor. However, you can certainly use chunky peanut butter if you prefer a bit of extra texture.
Is this recipe difficult for begin extractners?
Not at all! This recipe is designed to be straightforward and forgiving. As long as you can follow basic baking instructions, you’ll have no problem creating this delicious dessert.
Chocolate Peanut Butter Brownie Pizza
A decadent dessert pizza featuring a rich brownie base topped with peanut butter chocolate spread, banana, and strawberries.
Ingredients
-
1 1/4 cup REESE Spreads peanut butter chocolate
-
2 eggs
-
1/2 cup all purpose flour
-
1/2 teaspoon salt
-
1/3 cup REESE Spreads peanut butter chocolate
-
1 banana, sliced
-
4 strawberries, sliced
Instructions
-
Step 1
Preheat your oven to 350°F (175°C) and grease a pizza pan. -
Step 2
In a large bowl, whisk together 1 1/4 cups of REESE Spreads peanut butter chocolate, eggs, all-purpose flour, and salt until well combined. -
Step 3
Spread the brownie batter evenly onto the prepared pizza pan to form the crust. -
Step 4
Bake for 15-20 minutes, or until a toothpick inserted into the center comes out with moist crumbs. -
Step 5
Remove the brownie pizza from the oven and immediately spread the remaining 1/3 cup of REESE Spreads peanut butter chocolate over the warm crust. -
Step 6
Arrange the sliced banana and strawberries on top of the peanut butter chocolate layer. -
Step 7
Allow to cool slightly before slicing and serving.
Important Information
Nutrition Facts (Per Serving)
It is important to consider this information as approximate and not to use it as definitive health advice.
Allergy Information
Please check ingredients for potential allergens and consult a health professional if in doubt.