Strawberry Cheesecake Dessert Tacos Delight
Strawberry Cheesecake Dessert Tacos are about to revolutionize your dessert game. Forget everything you think you know about tacos, because these sweet sensations are an absolute revelation! We’re talking about the perfect marriage of creamy, dreamy cheesecake filling and the bright, juicy burst of fresh strawberries, all nestled within a crisp, golden taco shell. Who doesn’t love the indulgent richness of cheesecake? And when you pair that with the irresistible portability and fun of a taco? Well, it’s a match made in culinary heaven. What makes these Strawberry Cheesecake Dessert Tacos so incredibly special is their delightful balance of textures and flavors. The smooth, tangy cheesecake is beautifully complemented by the sweet strawberries, while the crunchy taco shell provides that satisfying textural contrast we all crave. They’re an elegant yet incredibly approachable treat, perfect for impressing guests or simply treating yourself to something truly extraordinary.
Strawberry Cheesecake Dessert Tacos
Get ready for a dessert that’s as fun to make as it is to eat! These Strawberry Cheesecake Dessert Tacos are a delightful twist on two classic treats, bringin extractg together the creamy indulgence of cheesecake with the playful handheld format of a taco. Imagin extracte warm, cinnamon-sugar coated tortillas cradling a luscious, no-bake strawberry-cheesecake filling, all topped with a vibrant, homemade strawberry sauce. They’re perfect for a special occasion, a fun family dessert night, or simply when you’re craving something sweet and a little bit fancy, without all the fuss of a traditional cheesecake. The combination of textures and flavors is simply irresistible: the slight crunch of the tortilla, the smooth and tangy cream cheese filling, and the burst of fresh berry goodness.
Ingredients:
Instructions:
Preparing the Taco Shells
The first step in creating our delightful dessert tacos is to prepare the “shells.” These aren’t your average savory tortillas; we’re transforming them into sweet, crispy vessels. In a shallow dish, combine the ½ cup of granulated sugar with the 1 tablespoon of ground cinnamon. This aromatic blend will give our tortillas that irresistible warm spice note. Next, take your 6 small flour tortillas and brush both sides lightly with the melted unsalted butter. Don’t be shy with the butter; it helps create that beautiful crispiness and golden hue. Now, one by one, dip each buttered tortilla into the cinnamon-sugar mixture, ensuring both sides are well coated. Lay these coated tortillas flat on a baking sheet lined with parchment paper. We want them to get beautifully crisp, so we’ll bake them at 350°F (175°C) for about 8-10 minutes, or until they are golden brown and slightly puffed. Keep a close eye on them, as they can go from perfectly crisp to burnt very quickly. Once they’re ready, carefully remove them from the oven and let them cool completely on the baking sheet. As they cool, they will become wonderfully rigid, perfect for holding our delicious filling. For an extra taco-like shape, you can gently drape them over the rungs of your oven rack or a taco holder while they are still warm and pliable, letting them set into a curved shape as they cool.
Crafting the Creamy Cheesecake Filling
Now, let’s move on to the heart of our dessert tacos: the luscious cheesecake filling. In a medium bowl, ensure your 8 oz of cream cheese is truly softened. This is crucial for achieving a smooth, lump-free filling. You can leave it at room temperature for about an hour, or microwave it gently in 15-second intervals until it’s soft but not melted. To the softened cream cheese, add the ½ cup of powdered sugar and the 1 teaspoon of vanilla extract. Using an electric mixer or a sturdy whisk, beat these ingredients together until they are wonderfully smooth and creamy. It’s important to scrape down the sides of the bowl occasionally to make sure everything is incorporated evenly. In a separate, chilled bowl, whip the ½ cup of heavy whipping cream until stiff peaks form. This means when you lift the whisk, the cream holds its shape. Gently fold the whipped cream into the cream cheese mixture. Be careful not to overmix, as we want to maintain the airiness of the whipped cream, which contributes to the light and fluffy texture of our filling. The result should be a smooth, decadent, and slightly tangy filling that perfectly mimics the taste of classic cheesecake.
Whipping Up the Strawberry Sauce
No strawberry cheesecake is complete without a vibrant strawberry topping, and our dessert tacos are no exception. In a small saucepan, combine the 1 cup of chopped fresh or frozen strawberries with the ¼ cup of granulated sugar and the 1 tablespoon of lemon juice. The lemon juice adds a lovely brightness that cuts through the sweetness and enhances the strawberry flavor. Place the saucepan over medium heat and bring the mixture to a gentle simmer, stirring occasionally, allowing the strawberries to break down and release their juices. Once the mixture is bubbling slightly, slowly pour in the cornstarch and water mixture, stirring continuously. This is our thickening agent. Continue to cook, stirring constantly, until the sauce thickens to a lovely, jam-like consistency. This usually takes about 2-3 minutes. Be patient here, as the cornstarch needs a little time to activate. Once thickened, remove the saucepan from the heat and let the strawberry sauce cool. As it cools, it will thicken even further. You can leave some of the strawberry chunks intact for texture, or if you prefer a smoother sauce, you can briefly pulse it with an immersion blender.
Assembling Your Dessert Tacos
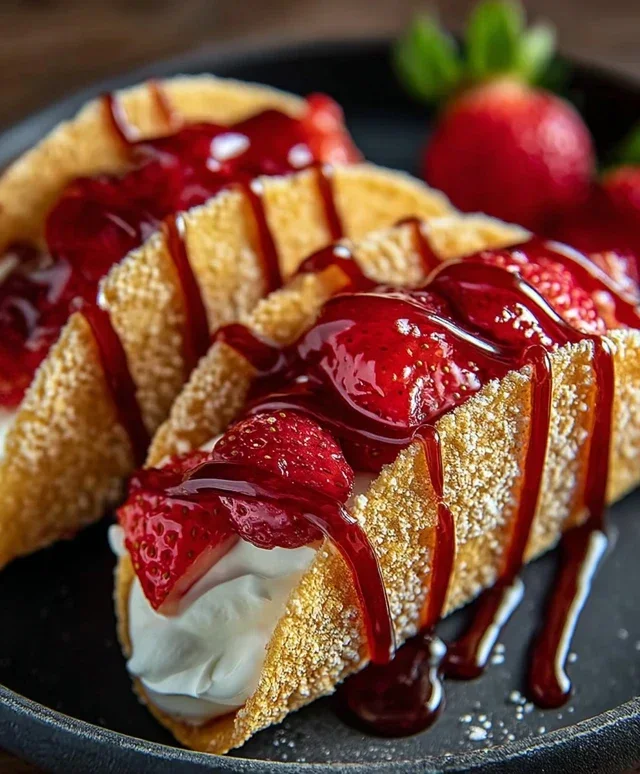
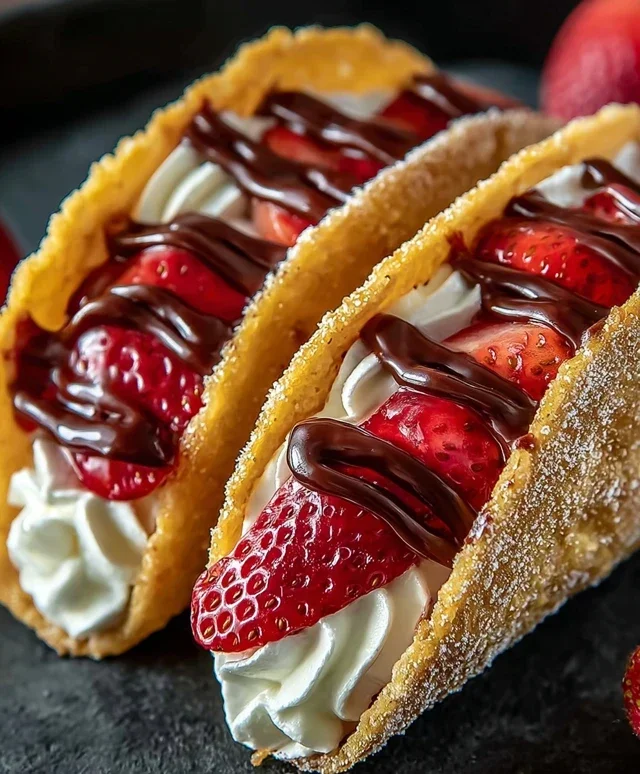
The moment we’ve all been waiting for: assembling these beautiful Strawberry Cheesecake Dessert Tacos! Take your cooled, crisp cinnamon-sugar taco shells. Carefully spoon a generous amount of the creamy cheesecake filling into each shell. Don’t overfill them, or the filling might spill out when you take a bite. Aim for a good balance of shell to filling. Once filled, drizzle a generous spoonful of the cooled strawberry sauce over the top of the cheesecake filling in each taco. For an extra touch of elegance, you can sprinkle a few extra chopped strawberries on top, or even a light dusting of powdered sugar.
Serving and Enjoying
These Strawberry Cheesecake Dessert Tacos are best served immediately after assembly to ensure the taco shells retain their delightful crispness. The contrast between the warm, spiced shell, the cool, creamy filling, and the sweet, slightly tart strawberry sauce is simply divine. They are a wonderfully portable and fun dessert, perfect for parties, picnics, or just a spontaneous treat. You can even set up a “taco bar” with the shells, filling, and sauce, allowing everyone to assemble their own custom dessert. The joy of these tacos lies in their unique combination of flavors and textures, offering a playful yet sophisticated dessert experience. Enjoy every delightful bite!
Conclusion:
So there you have it – your guide to crafting these delightful Strawberry Cheesecake Dessert Tacos! This recipe truly is a winner because it masterfully combines the creamy, tangy goodness of cheesecake with the sweet burst of fresh strawberries, all nestled within a crisp, delightful taco shell. It’s a playful and unexpected dessert that’s guaranteed to impress your friends and family, offering a unique twist on classic flavors that’s both sophisticated and incredibly fun. Whether you’re hosting a party, looking for a special treat, or simply craving something sweet and satisfying, these dessert tacos deliver on every level. They’re surprisingly easy to make, making them perfect for both novice bakers and experienced dessert enthusiasts alike.
To serve these beauties, consider a dusting of powdered sugar or a drizzle of balsamic glaze for a gourmet touch. They’re also fantastic alongside a scoop of vanilla bean ice cream. Don’t be afraid to get creative with variations! Swap the strawberries for other berries like raspberries or blueberries, or introduce some chocolate chips into the cheesecake filling for a richer flavor. For a textural contrast, try adding some chopped toasted nuts on top. I genuinely encourage you to give these Strawberry Cheesecake Dessert Tacos a try. I have a feeling you’ll absolutely love them as much as I do!
Frequently Asked Questions:
Can I make the taco shells ahead of time?
Absolutely! You can prepare the taco shells a day in advance. Store them in an airtight container at room temperature to maintain their crispness. Just be sure to assemble them close to serving time to prevent them from getting soggy.
What if I don’t have cream cheese?
While cream cheese is key for that classic cheesecake flavor, you could experiment with mascarpone cheese or a thick Greek yogurt mixed with a touch of lemon juice and cornstarch for thickening, though the texture and taste will vary slightly.
Are these suitable for a make-ahead party dessert?
You can prepare the components (cheesecake filling, strawberry topping, and taco shells) ahead of time. However, for the best texture and visual appeal, I recommend assembling them just before serving. The shells are best when fresh and crisp, and the filling is most vibrant when chilled.
Strawberry Cheesecake Dessert Tacos
A delightful and easy dessert taco recipe featuring creamy cheesecake filling and a sweet strawberry topping, all nestled in a cinnamon-sugar coated tortilla shell.
Ingredients
-
6 small flour tortillas
-
½ cup granulated sugar
-
1 tbsp ground cinnamon
-
½ cup unsalted butter, melted
-
8 oz cream cheese, softened
-
½ cup powdered sugar
-
1 tsp vanilla extract
-
½ cup heavy whipping cream
-
1 cup fresh or frozen strawberries, chopped
-
¼ cup granulated sugar
-
1 tbsp lemon juice
-
1 tbsp cornstarch mixed with 2 tbsp water
Instructions
-
Step 1
Preheat oven to 350°F (175°C). In a shallow dish, combine ½ cup granulated sugar and 1 tbsp ground cinnamon for the taco shells. -
Step 2
Brush both sides of each flour tortilla with melted unsalted butter. Dip each buttered tortilla into the cinnamon-sugar mixture, coating both sides. Drape tortillas over the rungs of your oven rack so they form a taco shape. Bake for 8-10 minutes, or until golden and crisp. Let cool completely. -
Step 3
In a medium bowl, beat together the softened cream cheese, ½ cup powdered sugar, and 1 tsp vanilla extract until smooth and creamy. -
Step 4
In a separate bowl, whip the heavy whipping cream until stiff peaks form. Gently fold the whipped cream into the cream cheese mixture. -
Step 5
In a small saucepan, combine the chopped strawberries, ¼ cup granulated sugar, and 1 tbsp lemon juice. Cook over medium heat until strawberries soften, about 5 minutes. -
Step 6
Stir in the cornstarch slurry (1 tbsp cornstarch mixed with 2 tbsp water) into the strawberry mixture. Continue to cook, stirring constantly, until the sauce thickens, about 1-2 minutes. Remove from heat and let cool slightly. -
Step 7
To assemble the dessert tacos, spoon the cheesecake filling into the cooled tortilla shells. Top generously with the strawberry sauce.
Important Information
Nutrition Facts (Per Serving)
It is important to consider this information as approximate and not to use it as definitive health advice.
Allergy Information
Please check ingredients for potential allergens and consult a health professional if in doubt.