Easy French Macaron Recipe- Perfect Delicacy
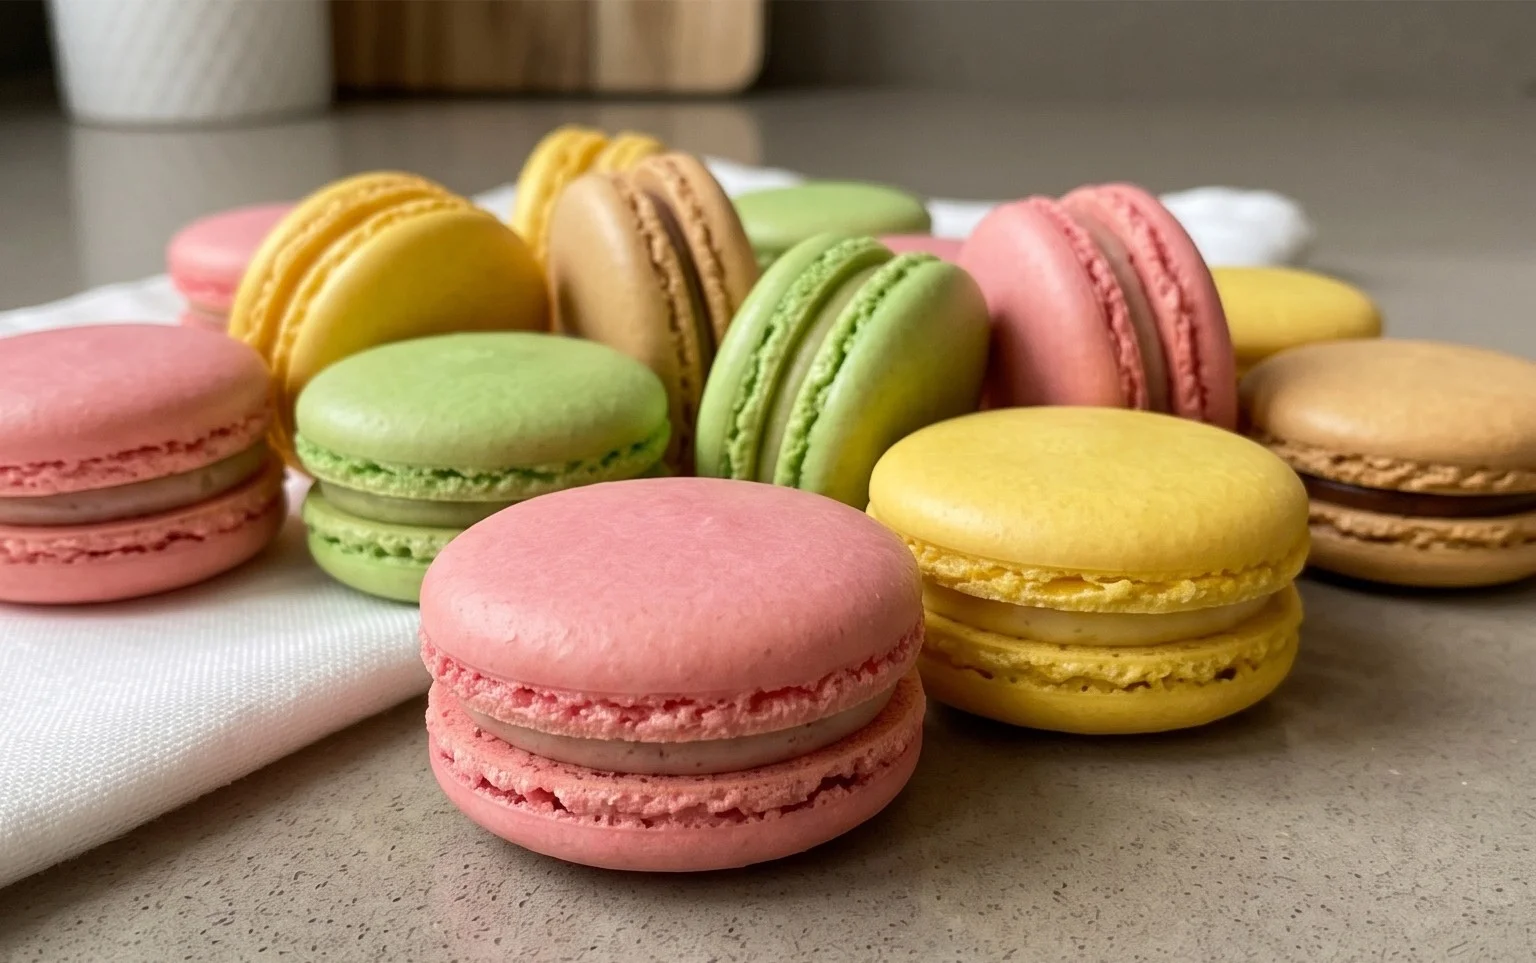
French macarons are more than just a delicate cookie; they are tiny, edible works of art that have captured hearts and taste buds around the globe. If you’ve ever found yourself gazing longin extractgly at those perfectly formed, vibrantly colored rounds in a patisserie window, wondering how to recreate that magic at home, you’re in the right place. The allure of a French macaron lies in its exquisite duality: a crisp, delicate shell that yields to a wonderfully chewy interior, all sandwiched together with a luscious filling. It’s this textural marvel, combined with an endless spectrum extract of flavors and colors, that makes the French macaron so utterly irresistible. Mastering the French macaron can feel like a culinary Everest, but with patience and the right guidance, I promise you, the reward of biting into your own perfectly baked French macaron is absolutely worth the journey.
French Macaron Recipe
Ah, the French macaron. These delicate, colorful, and utterly delightful meringue-based cookies are a true testament to the art of patisserie. Their crisp shell giving way to a chewy interior, all sandwiched with a luscious filling, makes them a coveted treat. While they have a reputation for being finicky, with a bit of patience and attention to detail, you can absolutely achieve macaron perfection in your own kitchen. This recipe will guide you through the process, ensuring your macarons are as beautiful as they are delicious.
Ingredients:
Preparation and Mixing
The foundation of a successful macaron lies in meticulous preparation. Before you even think about whisking, ensure all your ingredients are accurately measured and at the correct temperature. Room temperature egg whites are crucial for achieving the right meringue consistency; cold egg whites will not whip up as effectively. Sifting your almond flour and powdered sugar together is also non-negotiable. This step removes any lumps and ensures a smooth, homogenous batter, which translates to smooth macaron shells.
1. Prepare the Dry Ingredients: In a medium bowl, whisk together the sifted almond flour, powdered sugar, and salt. If you don’t have super-fine almond flour, you can pulse regular almond flour in a food processor a few times until it’s finer, but be careful not to over-process and turn it into almond butter. Sift this mixture at least twice through a fine-mesh sieve. Discard any larger almond pieces that remain in the sieve; these can cause imperfections in your macaron shells. Set this aside.
2. Make the Italian Meringue: In a small saucepan, combine the granulated sugar with 30 grams of the egg whites. Place this saucepan over medium heat and stir constantly until the sugar dissolves. Once dissolved, stop stirring and let the sugar syrup boil until it reaches 215°F (102°C) on a candy thermometer. While the syrup is heating, begin extract whipping the remaining 90 grams of egg whites in a clean, grease-free bowl of a stand mixer fitted with the whisk attachment. Once the egg whites start to form soft peaks, slowly and carefully stream the hot sugar syrup into the whipping egg whites while the mixer is running on medium-high speed. Continue to whip the meringue until it is stiff, glossy, and has cooled to room temperature (this can take 5-10 minutes). This Italian meringue method provides a stable base for your macarons.
3. Color and Flavor the Meringue: Once your Italian meringue has cooled completely, it’s time to add color and flavor. Gently fold in the vanilla extract and the liquid-gel food coloring. If you’re using gel coloring, add it a few drops at a time, folding gently until you achieve your desired shade. Be mindful that the color will lighten slightly as the macarons bake.
4. Macaronage – The Crucial Folding Step: This is arguably the most critical stage in macaron making. Add about one-third of your sifted dry ingredients to the meringue and fold gently using a rubber spatula. Once incorporated, add the remaining dry ingredients in two more additions, continuing to fold. The goal here is to deflate the meringue just enough to create a smooth, lava-like batter. You’re looking for a consistency where the batter flows slowly off the spatula in a thick ribbon, and it should fall back into the bowl, slowly spreading to form a “figure 8” without breaking. Be careful not to overmix, as this will result in flat macarons with no feet, or undermix, which will lead to dry, cracked shells. This process is called “macaronage.”
Baking Your Masterpieces
Once your batter is just right, it’s time to shape and bake. Properly prepared baking sheets and a consistent oven temperature are key to getting those coveted “feet” – the ruffled edges at the base of the macaron.
5. Piping and Resting: Prepare baking sheets by lining them with parchment paper or silicone baking mats. You can draw circles on the parchment paper as a guide if you like. Spoon the macaron batter into a piping bag fitted with a round tip (about 1/2 inch). Hold the piping bag directly over the baking sheet and pipe small rounds of batter, about 1.5 inches in diameter, leaving some space between each macaron. Once piped, firmly tap the baking sheets on the counter several times. This helps to release any trapped air bubbles that could cause cracking during baking. Now, let the piped macarons rest at room temperature for at least 30 minutes, or until they have formed a dry skin. You should be able to lightly touch the surface without any batter sticking to your finger. This resting period is essential for the macarons to develop their feet.
Preheat your oven to 300°F (150°C). Bake the macarons in batches for 12-15 minutes, rotating the baking sheets halfway through. The macarons are done when they have developed their feet and the shells are firm to the touch. They should not wobble when gently nudged.
Filling and Enjoying
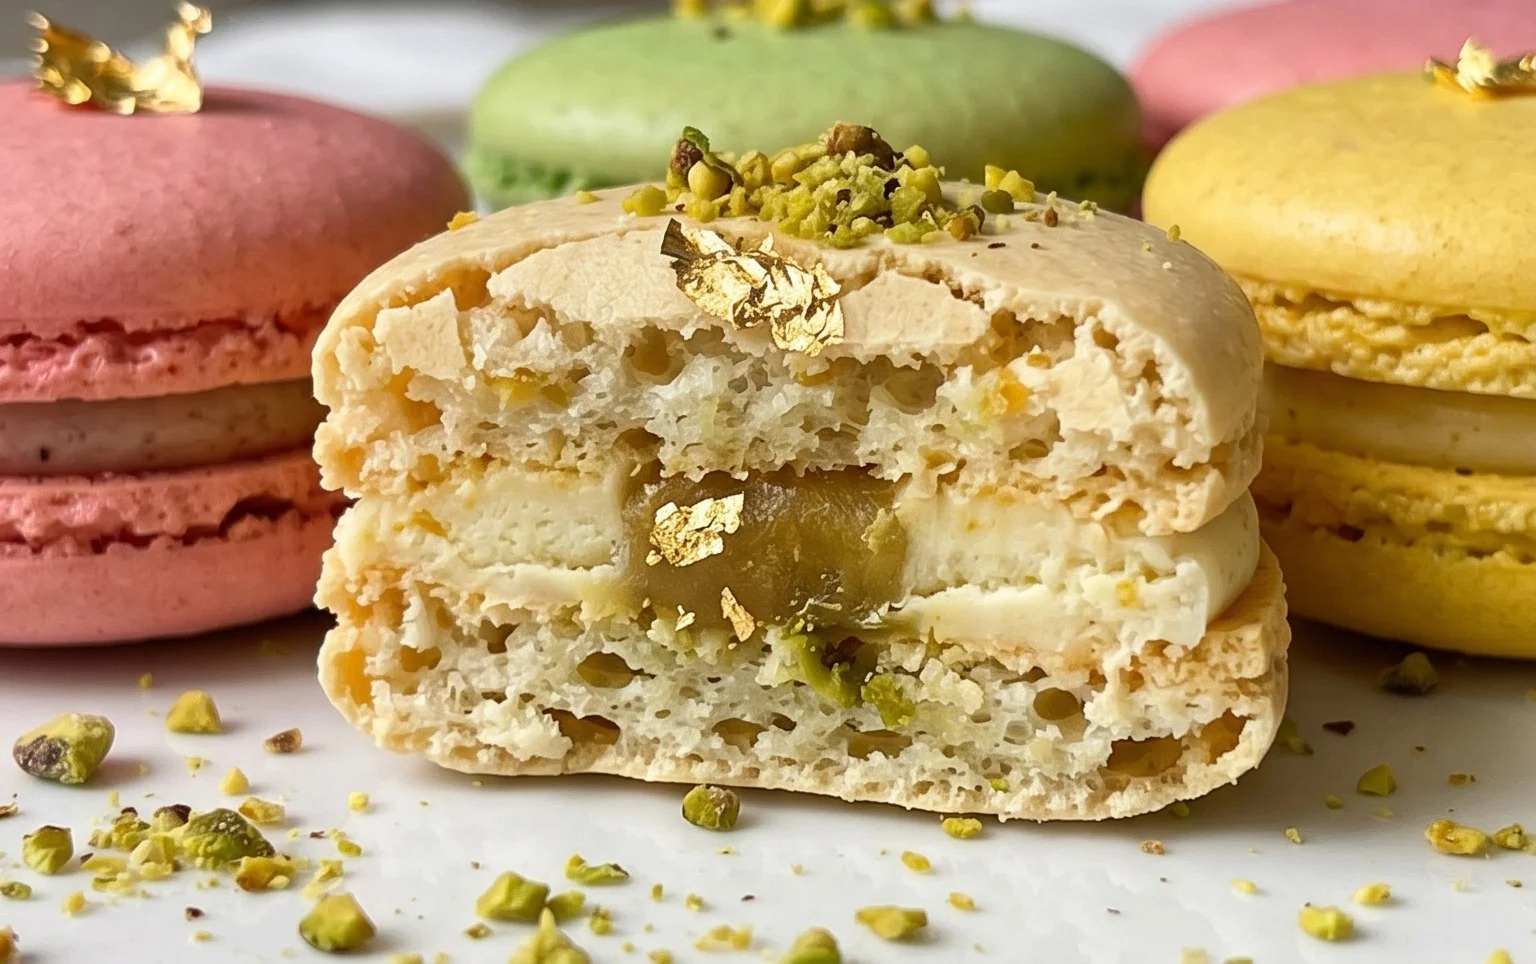
After baking, carefully remove the macarons from the oven and let them cool completely on the baking sheets before attempting to peel them off. Once cooled, pair up similarly sized shells and pipe your chosen filling – vanilla buttercream is a classic, but lemon curd, chocolate ganache, or raspberry jam are also wonderful options. Gently sandwich the filled macarons together and let them “mature” in an airtight container in the refrigerator for at least 24 hours. This resting period allows the flavors to meld and the textures to soften, creating the perfect chewy interior. Enjoy your homemade French macarons!
Conclusion:
Embarking on the journey of making French macarons might seem daunting, but as you’ve seen, this recipe breaks down the process into manageable steps, making these delicate, airy cookies achievable even for home bakers. The beauty of this French Macaron recipe lies in its simplicity and the incredible results – perfectly crisp shells that yield to a chewy interior, all ready to be sandwiched with your favorite fillings. They truly are a showstopper for any occasion, whether it’s a celebratory tea party, a thoughtful homemade gift, or simply a personal treat to brighten your day.
These macarons are wonderfully versatile. Enjoy them as they are, or get creative with fillings! Classic ganache, buttercream, or even fruit curds are fantastic choices. For a touch of flair, consider adding a drop of food coloring to the batter for a vibrant pnon-alcoholic alette, or experiment with extracts like rosewater or lavender for unique flavor profiles. Don’t be discouraged if your first batch isn’t perfect; practice truly makes perfect with macarons. I encourage you to give this French Macaron recipe a try – the reward of biting into your own perfectly crafted macaron is incredibly satisfying!
Frequently Asked Questions:
Why are my macarons hollow?
Hollow macarons are often a result of oven temperature issues or under-mixing the meringue. Ensure your oven is accurately calibrated and that you’ve achieved stiff peaks when whipping your egg whites. Over-mixing the almond flour and powdered sugar mixture can also contribute to this.
What is ‘macaronage’?
Macaronage refers to the critical stage of folding the dry ingredients (almond flour and powdered sugar) into the meringue. The goal is to achieve a lava-like consistency where the batter flows slowly from the spatula in a ribbon, but not so runny that it spreads out too much. This step is crucial for getting smooth, well-formed shells.
Can I make macaron shells ahead of time?
Absolutely! Macaron shells can be baked and stored in an airtight container at room temperature for a day or two, or frozen for up to a month. Once filled, they are best stored in the refrigerator. They actually improve in texture after a day or two of resting in the fridge, allowing the filling to soften the shells slightly.
French Macaron Recipe
A classic recipe for making delicate and flavorful French macarons with a smooth, chewy interior and a crisp shell.
Ingredients
-
150 grams sifted super-fine almond flour
-
180 grams powdered sugar
-
1/4 teaspoon salt
-
120 grams large egg whites (at room temperature)
-
60 grams granulated sugar
-
4 drops liquid-gel food coloring
-
1 teaspoon pure vanilla extract
Instructions
-
Step 1
Combine sifted almond flour and powdered sugar in a food processor and pulse until finely ground. Sift this mixture through a fine-mesh sieve to remove any large lumps. -
Step 2
In a clean, dry bowl, whisk the egg whites until frothy. Gradually add the granulated sugar, a tablespoon at a time, while continuing to whisk until stiff, glossy peaks form, creating a meringue. -
Step 3
Gently fold the colored egg whites into the almond flour and powdered sugar mixture in three additions, until a smooth, lava-like batter forms. Stir in the vanilla extract. -
Step 4
Transfer the batter to a piping bag fitted with a round tip. Pipe small, uniform circles onto baking sheets lined with parchment paper or silicone mats. -
Step 5
Tap the baking sheets firmly on the counter several times to release any air bubbles. Let the piped macarons sit at room temperature for 30-60 minutes, or until a skin forms on the surface. -
Step 6
Bake in a preheated oven at 300°F (150°C) for 12-15 minutes, or until the macarons have developed feet and are firm to the touch. -
Step 7
Remove from oven and let cool completely on the baking sheets before carefully peeling them off. Once cooled, sandwich with your favorite filling, such as Vanilla Buttercream Frosting.
Important Information
Nutrition Facts (Per Serving)
It is important to consider this information as approximate and not to use it as definitive health advice.
Allergy Information
Please check ingredients for potential allergens and consult a health professional if in doubt.